|
Review: Philips DVDR3480/05 Firmware: n/a |
Manufacturer and product information
Introduction: Philips, DVD recording, and the DVDR3480
As one of the original members of the DVD Alliance (the set of commercial interests overseeing the development of the ‘plus’ recordable DVD format), Philips has had a long-standing involvement with DVD-Video recorders. From the first consumer DVD recorder (DVDR1500 Mk I and II), followed by the DVDR70/75 series (which were a particular success in the USA with its 720p output), Philips blazed a trail in getting people switched over from their VHS recorders and onto DVD recording. However there rapidly followed a nadir in Philips reputation when a serious systematic component fault in the DVDR880/890 series caused them to offer an official acknowledgement and an extended guarantee to the owners. Despite this, Philips began to concentrate more on making the most of their technological input to the DVD ‘plus’ format; leaving behind the manufacturing commitments and establishing the ‘Nexperia’ family of integrated circuits. These were designed as ‘all-in-one’ solutions for other electronics companies who were keen to manufacture standalone DVD recorders and thus obtain a market share, and subsequently the Nexperia chips found their way into a number of third-party DVD recorders which in the long term probably helped to stabilise the Philips commercial reputation.
Since then, Philips have kept their toe in the water of DVD recording with the release of a few technically innovative models; notably the HDRW720 with its 6-hour recording buffer, and then the DVDR7250 which was the first standalone to offer recording of DTS and Dolby 5.1 channel audio. However there has always been a feeling that it all generally it wasn’t a very focused approach to what consumers were wanting. Reasons for this could include the major HD-DVD vs. Blu-Ray debate – of which Philips has a major parallel intellectual investment - or perhaps its multinational presence has an certain inertia in deciding what is going to happen with high-definition broadcasting across the world; and thus how to best record it.
Anyway some of us have been waiting for too long, and whether by accident or design of Philips we think that the recorder featured in this review - the DVDR3480 - fills a definite niche in the current market for a basic, high performance, yet value-for-money DVD recorder that should see you through until Blu-Ray stuff is as cheap as chips. Particularly if you are happy with DVD-Video resolution, have a terrestrial, cable, or satellite box that has its RGB SCART or S-Video outputs unprotected, and want to record the stuff that’s either playing or you’ve already recorded on the box’s hard drive.
Company info
Here is some of the more objective current information taken from the Philips website:
“Royal Philips Electronics is one of the world's biggest electronics companies and Europe's largest. It is a global leader in Healthcare, Lifestyle and Technology based product and service solutions. A substantial local activity supports Philips business and marketing operations in the UK.
The Consumer Lifestyle sector employs approximately 25,000 people in 49 countries and operates in the business areas Connected Displays, Video & Multimedia, Audio & Multimedia, Home Networks, Peripherals & Accessories, Domestic Appliances, Shaving & Beauty and Health & Wellness. It runs manufacturing operations in the Netherlands, Belgium, France, Hungary, Austria, Poland, the USA, Brazil, Argentina, Mexico, China and Singapore.
Philips’ substantial investment in R&D has generated many breakthrough inventions, such as the Compact Cassette system and the laser based optical disc systems CD-Audio, CD-ROM, CD-R/RW, SACD and various DVD-formats.”
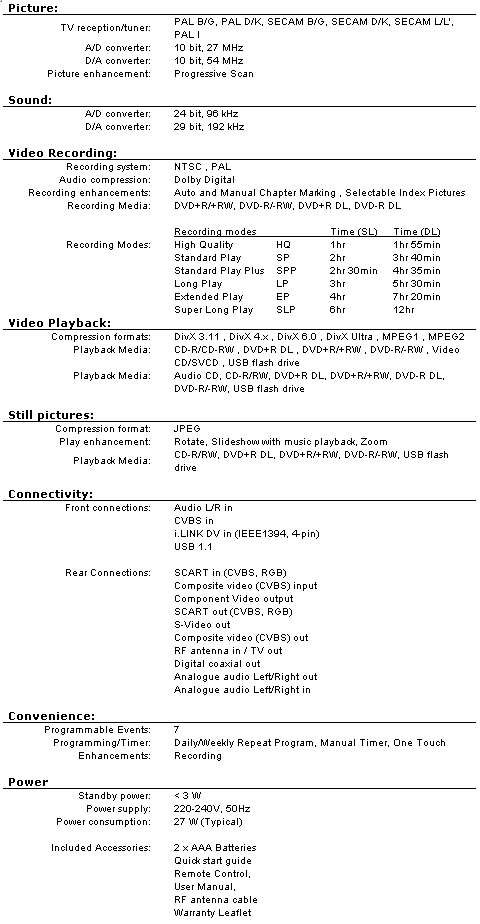
DVD Recorder DVDR3480 Specifications
A summary of the recorder capabilities, as advertised on the Philips website and the manual, appears below:
Aims of this review
This assessment will focus on the general practical use of the DVDR3480; mainly highlighting its strengths, revealing some hidden capabilities, pointing out its occasional weaknesses, and stating where it departs from the official specifications. In all of this assessment, we will relate the features and capabilities back to the price of the recorder and make some judgement on value-for-money. Please note that we can’t check out everything, but we will try and report the most significant factors. There will be a thread in the CD Freaks ‘Philips DVD Recorder and Player’ forum for comments, questions, and potential amendments to this review.
Secondly, this review is for a UK specification machine (with an ‘05’ suffix). Philips does make considerable changes to recorders destined for other continents or countries, and readers might find the DVDR3480 version for their locality to have features different to the one described here. For full and current specifications, readers should look at the Philips website page for the DVDR3480 (here). In addition, Philips makes all the user manuals for consumer electronics available as downloadable PDF documents: so if you want to check out for yourself how to use the DVDR3480 in imaginary terms; please click here.
For the screen-shots of the DVDR3480 we used the S-Video output of the recorder, digitised by a Eskape Labs ‘MyTV2Go’ hardware USB 1.1 device attached to a Macintosh Powerbook G4 running OS X 10.3.9. Display capture software was the proprietary ‘MyTV/x’ version 3.6.9 for OS X.
What’s in the box..?
The recorder comes in a well-illustrated and sturdy box, fitted with a comfortable plastic carry handle. Inside is the DVD recorder unit, wrapped in a layer of shock-absorbing polythene material and suspended in a masterpiece of cardboard origami. Lying protected within the niches of the packing are the remote control, 2 x AAA batteries, a printed manual, a ‘Quick Setup’ guide, and an RF coaxial lead.
Basically the recorder is effectively centred in the box and looks very well-protected from the knocks that can be acquired during transportation. The use of recyclable cardboard to suspend the unit, rather than the usual expanded polystyrene (Styrofoam) or polythene blocks, is worth a side-note with the prevailing global outlook towards sustainable resources.
Note that there is neither an RGB SCART cable provided, nor a blank disc to get you started.
The manual is very well organised, and the descriptions of connection and operation are clear and concise; all the information we needed from time to time was to be found there. It is printed on quite cheap paper, but considering the high standard of the content and the price of the DVDR3480, we found this quite forgivable.
Note that the recorder comes with Philips’s ‘Home Premium Guarantee’, which basically means that they will provide you with a replacement machine within seven days if it is necessary to have the machine returned for repair.
First impressions
Main recorder unit
On unwrapping and examining the recorder, it feels well-built and is of expected weight for its size. The main casing is metal with a good silver paint finish, with a small area of air-vent slots cut into the top, and there are four rubber feet for it to sit on. The body is rigid, resistant to twisting, and nothing feels loose when you shake it.
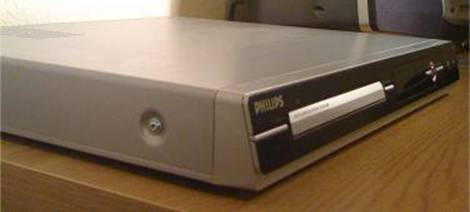
Note that the front panel and display are sloping backwards. This makes it easier to read when you’re standing up, bending down to press the buttons, or to get access to the front inputs without getting down on your knees; which is especially helpful if the recorder is at the bottom of a pile of AV devices.
The front panel is mainly high-quality glossy black plastic, with a minimum number of round or bar-shaped buttons with a brushed-metal finish. A fold-down flap on the right-hand side reveals some input connectors: yellow/white/red phono sockets for composite video, left and right stereo audio, a horizontal USB port (1.1 standard), and a vertical i.Link port (IEEE1394; ‘FireWire’) for recording DV:

The DVD tray opens smoothly and steadily and seems of good build quality (unlike some of the cheap ‘other brand’ DVD players where you feel the disc tray would snap off with the slightest pressure). The short display panel shows an array of basic status messages and is a restful green colour:

The rear panel connector arrangement is well documented in the manual, and is mainly for output: progressive scan phono; CVBS video phono; RGB SCART; S-Video DIN; analogue audio left & right phono; digital SP/DIF phono. For external input there is one SCART RGB. For analogue TV reception there is a pair of RF aerial in/out coaxial sockets.
Overall we feel it is a slim and very attractive-looking unit; of a design and quality exceeding what you’d expect for such a low-cost DVD recorder.
Remote control
This looks like a vastly-improved design from previous Philips remotes. It is made from high-quality rigid black plastic with a wedge-shaped front - which in a way mirrors the sloping front panel of the main recorder unit – and with the infra-red LED sender recessed under a hollowed-out front. The buttons are translucent white silicone rubber and arranged into easily identifiable groups; but there is no backlight. The remote runs on 2 x AAA batteries (supplied).
Remote control, looking from above:

Remote control, showing the recessed IR sender:

As well as looking good, this remote is a whole lot better in operation than those previously supplied by Philips. The majority of the buttons work satisfactorily: but the four wedge-shaped ‘arrow’ ones can be a bit problematic at first. Because of the sloping angle of the top surface, pressing any one of these forces the button slightly sideways against the remote body and makes it harder to press straight down, so you get a feeling of ‘smearing’ of the button rather than getting a satisfying rubbery click. The end result is that the button-press action may not work; or it does work and you don’t feel it. After some practice of remembering to press slightly inwards, against the natural slope of the button, it’s possible to get used to it and becomes not so much of a problem. However it’s a slightly irritating quirk that perhaps could have been sorted out pre-manufacturing.
Another problem that you have to overcome is remembering not to put your finger over the IR sender. Some of the buttons at the top end of the remote are quite small, and a bit more force is needed to press them. A natural response is to fit your index finger beneath the top end and into the recess to help apply the extra pressure: which of course covers up the LED and prevents the signal from being emitted. Again, this is another mildly irritating design quirk which takes a bit of practice to avoid.
Despite these two minor inconveniences, in overall terms the remote has been considerably improved from past efforts, and is of very good quality considering the retail pricing of the DVDR3480.
Setup and basic machine operation
The manual gives very clear and comprehensive diagrams of the various ways of attaching the audio-visual cables to fit the DVDR3480 into pretty much any home entertainment setup. Not everyone will want to record from analogue TV, but nevertheless we attached the RF coaxial cable coming from a domestic aerial. Note that if you’re in the UK this can be exactly the same aerial cable as supplies a Freeview receiver, because the signals travel in the same wire and most Freeview boxes have an RF out socket to enable the signal to be ‘looped-through’ to the recorder (which in turn loops through up to the TV aerial socket).
In our main test setup, we also wanted to record directly from cable and the Freeview PVR set-top box output (i.e. not to be limited to the 5 UK aerial analogue transmissions), so connected them all with SCART cables in a similar loop-through arrangement between their respective external IN and external OUT RGB SCART sockets.
Analogue aerial connections: Aerial -> Freeview PVR -> DVDR3480 -> TV
RGB SCART connections: Cable box -> Freeview PVR -> DVDR3480 -> TV
For completeness we should mention that we used the S-Video output of the recorder to take the screenshots for this review. The resolution and colour balance in the images below are just to give an idea of the screen and menu layouts, and do not really do justice to the superior display on a TV when using the RGB-out connection.
Tuning to analogue TV
When you switch the unit on for the first time, it enters an automatic setup routine which includes tuning to the local analogue TV reception. However, we’ll just look briefly at the manual procedure because it shows the stages more clearly.
Pressing the <SETUP> button on the remote, then selecting ‘Tuner’ produces the following screen:

Select ‘Auto Search’ tells the machine to search for analogue channels, store them, and return to the menu.

Tuning is very quick, taking only a few minutes to scan the UK TV broadcast spectrum. The recorder offers the chance to manage the channels it has found, by selecting ‘Manage presets’ from the tuner section:

The options for organising the channels or fine tuning their reception are self-explanatory and also addressed in the user manual.
Mini-verdict
Overall we found this to be one of the easiest recorders yet to set up, even in manual mode. The cable diagrams in the book are simple to follow and yet cover a multitude of home entertainment connections. Once turned on, the screen menus are exceptionally clear and intuitive to use. The idea of ‘tabbed’ pages to display the various setup options is well implemented on the DVDR3480 and certainly a further improvement on previous Philips recorders.
Making an immediate DVD recording from analogue TV
The first thing is to say that we found the estimates in the manual of how much a DVD could hold were slightly different from what the recorder reports as free recording time when you put in a disc. This is a summary of what we found:

Although a few minutes here and there doesn’t seem much on the single layer discs, with double layer from SP onwards you might expect another 20 minutes recording time and it could make the difference between choosing a reduced quality mode when not completely necessary. Some of the official estimate could be accounted for by the variable bitrate, which would tend to use more capacity when recording fast-moving video sources; but on the whole if you don’t record this type of thing then you should expect more recording time than Philips actually say in the manual.
Once you’ve chosen the appropriate mode to make a recording, insert a disc in the recorder tray. A small spinning disc icon appears in the top left-hand corner of the TV screen while the recorder assesses what type of disc it is. The disc class is then briefly displayed and the icons disappear.
Factory default recording quality is set to ‘SP’, but this can be altered before you start recording, in two ways:
- Short way: Press the <REC MODE> button on the remote, which shuffles through the 6 quality modes by showing little icons on-screen.
- Long way (and to set/change the machine default): Press the <SETUP> button and change the recording mode from there:

To start making a recording of a programme currently on the display, just press the <REC> button on the remote: this is the so-called ‘One-Touch Record’ (OTR) facility. The recorder will start with a brief on-screen message summarising the settings.
If you want to limit the time for this immediate recording mode – which otherwise carries on until the end of the disc is reached – you press the <REC> button again. This firstly limits the recording time to 30 min, and each successive press increases it by another 30 min. The maximum is 6 hours, providing there is enough space on the disc.
The recording can be stopped at any time, after which there is a brief pause while the recorder updates the disc with the recorded information.

Disc menu of recordings
If you want to watch what has just been recorded, press the <DISC> button on the remote. Another nice-looking menu is displayed with thumbnails of the recordings on the disc and various details of each on the right-hand side. In the screen below, the top left recording is selected and the details on the right are: programme recorded from BBC1 on the 15th March at 9.15am; length of recording is 10 min at HQ quality (approximate size of 600 MB).
Below that is the remaining capacity of the disc after accounting for these six recordings: if HQ is needed then there’s just over 37 minutes (or approx 2.5 GB) remaining. Changing the recording quality to something lower should increase this capacity; and pleasingly, pressing the <REC MODE> button on the remote updates this information straight away for the new quality setting.

Selecting a recording to watch is easily done using the arrow buttons on the remote, after which the currently selected icon becomes a motion thumbnail with an emphasised border. The motion continues well into the recording, rather than the common limit of the first 10 or 20 seconds, so it’s possible to identify a recording by watching the thumbnail for a minute or two. In fact – although we didn’t actually test this - you can probably watch the whole program from the thumbnail if you want.
Don’t forget if you want to watch the +R or –R recordings you‘ve made on a different player or recorder, the discs must first be manually finalised from the ‘Setup’ menu. Finalising of the discs seems quick and takes little more than a minute, except for the DL discs which can take a couple of minutes.
Finalising doesn’t apply to the rewriteable formats +RW and –RW: amazingly the DVDR3480 seems to both auto-format and auto-finalise the -RW to DVD-Video.
Mini-verdict
Overall this DVD recording process is superbly implemented in the DVDR3480, in no small part due to the intuitive menus. It is simple to use and we would guess be easy for most people to get used to very quickly. The disc updating procedure after the recording finishes is pretty quick, and the on-screen information is relevant and concise. Similarly, choosing playback of the recordings is made exceptionally easy with the motion thumbnails, especially where a series recording has been made and all episodes starting off almost the same.
Recording from external inputs
This is pretty much the same as for recording from the analogue transmissions, except that you have to select the correct input for the recorder using the <SOURCE> button on the remote. Each button press cycles through the two options of ‘CAM’ (the front panel IEEE1394 (FireWire) digital input) or ‘EXT2’ (the rear SCART connector carrying RGB) and then back to the analogue TV reception.
Note that there is no S-Video input, with the standard DIN socket at the back being an output only. The front USB port is playback only and not available as source for recording.
Timer recording
The DVDR3480 allows up to 7 timed recordings to be stored at once, as long as the projected recording times from first to last are within the same month’s time-frame (ie not a particular calendar month). In most cases this will not be a problem, except for those who might be going away for longer than that, or who want to make more than 7 recordings in their absence. However the timer does allow for repeat recordings at the allocated time settings, and which will still only count as one entry in the timer schedule.
Unfortunately there is no facility to take advantage of VPS/PDC (the analogue recording signal that is broadcast to allow late adjustments in programme delivery). Nor is there a VideoPlus facility, so all timer settings have to be manually entered.
The timer menu has the same menu colour theme as the others, but is in table form rather than tabbed. Pressing <TIMER> button on the remote shows the blank table, and pressing the <OK> button starts to add information into the first line:

As indicated by the small triangle-shaped arrows, you can use the <UP>/<DOWN> arrow keys on the remote to change the parameters at each step; alternatively the number keys on the remote can be used if the suggested entries are a long way off what you want. Using the <RIGHT> and <LEFT> arrow keys moves along the line of the table to enter or change the information about the timed recording. When you’re happy, pressing <OK> again enters the data as a timer entry and starts the next one.
The DVDR3480 allows timed recording from all its inputs, so you can set a timer to record from a cable or Freeview box by selecting ‘EXT2’ as the source. Similarly, you could make a timed recording from a DV camera via the front IEEE1394 FireWire input (select ‘CAM’ as the source). Unfortunately, as mentioned previously, you can’t select the front USB socket as an external input.
Once you start to add a few entries, it’s possible to accidentally over-run the disc space available. In this case the machine will prompt you to remember to change discs if necessary. Alternatively you can use the ‘AUTO’ setting for record quality in the timer entry, where the recorder will automatically select the best mode depending on disc space (note that this is NOT like a fit-to-space function of some recorders, where the bitrate is optimised in a continuously variable way, but merely selects one of the 6 predetermined recording quality modes). It is also possible to disable a timer entry without removing it from the list; say if you don’t want to use it one particular week or to have it excluded from the calculation of disc space.
Here’s an example of a semi-populated timer, with many different alternatives selected:

Mini-verdict
The timer facility is clearly laid out and easy to use. The on-screen table format helps enormously in locating booked recordings. However because setting a timer is more intensive on the use of the remote control buttons, the sponginess of the arrow keys became more obvious and a bit irritating for this particular procedure. Lack of VideoPlus is a minor concern but perhaps left out to keep the costs of the recorder low.
Burn quality on different disc types
An introduction to disc quality checks.
At CD Freaks we see a lot of problems with standalone DVD recorders not accepting particular brands of blank DVD discs, or making recordings which are not compatible with DVD players. Reasons for the former can be explained by the tendency of some DVD recorder models to be picky about disc types, but also because of the higher speed ratings and recording dye types now marketed by the optical disc manufacturers. Reasons for the second group of problems can be due to poor quality of recordings or the failure of recorders to take advantage of built-in compatibility settings of <plus> format DVD discs.
Several general points are worth discussing here. The first is that DVD recorders without a hard disk have to write to DVD discs in real-time; effectively at 1x. But the majority of blank discs currently for sale are rated at least 8x and more likely 16x, and are designed to support the faster write speeds of computer optical drives. What is also problematic is the introduction of new recording dye types by the disc manufacturers, which have different light absorbances and reflectiveness that can be difficult for the recorder’s optical writing unit to accommodate. Essentially, this can cause difficulties with older standalone DVD recorders not recognising the media, or perhaps producing bad burns after not being able to assess the optimum writing strategy or laser power needed for a particular disc. This can be partly addressed with manufacturer’s firmware updates – which give the standalone recorder’s optical drive the necessary instructions on how best to write to newer media – but this does not help if you have just bought some new discs, where they aren’t recognised, and there isn’t a firmware update available. Also, inevitably there will eventually be a limit to how many new disc speeds and dye types can be effectively catered for by such updates.
To help deal with this potential problem, Philips has added a feature to the DVDR3480 called ‘SmartAlgo’. Presumably this is a means of either doing preliminary power calibration tests on an inserted disc, perhaps taking real-time feedback on burn quality whilst a recording is being made and retaining the information for subsequent recordings. Such capabilities are already found in utilities supplied by the manufacturers of computer optical drives, for example by BenQ and LiteOn (on-line hypertuning), and which allow the optimising of burn quality for different media types.
The Disc Quality tests…
Philips describes the DVDR3480 as supporting “dual media”: for which their definition is ‘DVD+R/RW, DVD-R/RW and DVD+R DL’. However the website, manual and specification sheets are confusing; in that sometimes –R DL discs are omitted, claimed to be read, or claimed to be written; depending on where you look. In order to sort it out we tried disc recordings on the DVDR3480 with all recordable DVD media types (except DVD-RAM).
The discs used were different dye types and speeds:
- single layer +R (two 8x and one 16x rated)
- single layer –R (two 8x rated)
- single layer +RW (one 4x and one 8x rated)
- single layer –RW (one 1-4x rated)
- double layer +R DL (one 4x rated)
- double-layer –R DL (one 4x and one 8x rated)
All recordings were made at HQ setting of the DVDR3480, finalised on the unit, and scanned between one and seven days later in a PC optical drive under the simple criteria according to those recommended in the CD Freaks’ Home Scanning article. Briefly, for scanning all the discs we used CD-DVD Speed version 4.07 with a LiteOn SHW-16H5S (firmware LV4D).
One table and two graphs are displayed for each disc: the table is the basic disc information including manufacturer’s media identity (MID); and the two graphs are the ‘Disc Quality Scan’ and the ‘Transfer Rate’ test. The former looks at the surface of the disc at a constant speed and measures detectable (yet correctable) errors in the recording. The transfer rate test pushes the error correction system of the drive up to a high speed limit and sees how well those errors on the disc can still be corrected under such ‘stress’.
The results and general comments are shown below, but for the detailed interpretation of these you should read in full the CD Freaks’ Home Scanning article.
DVD+R media ID: CMC MAG E01 (rated 8x speed)

Disc Quality scan:

Transfer Rate test:

Disc quality scan: Good figure of max PI error 22 (should be less than 280), and although most PI failures are less than 4, there are some at 5 and a max of 6 is a little high (ideally should be no higher than 4 except perhaps with a single spike).
Transfer rate test: excellent with no measurable drop in data transfer all the way up to 12x speed.
Preliminary conclusion: Great burn on an 8x-rated disc.
Note: From the disc info table it’s clear that the DVDR3480 is automatically book-typing the +R disc to DVD-ROM for maximum compatibility in other DVD players.
DVD+R media ID: YUDEN000 T02 (rated 8x speed)

Disc Quality scan:

Transfer rate test:

Disc quality scan: nice low PI error max of 14 (remember this should be less than 280). PI failures mostly 4 or less but a max of 6 right at the end of the disc can probably be ignored.
Transfer rate test: Perfect results with no slowdowns whilst reading up to 12x speed.
Preliminary conclusion: Good burn on an 8x-rated disc.
Note: Same book-typing of +R to DVD-ROM for compatibility
DVD+R media ID: YUDEN000 T03 (rated 16x speed)

Disc quality scan:

Transfer rate test:

Disc quality scan: very low PI error max of 15. PI failures mostly 4 or less but rises slightly towards the end of the disc.
Transfer rate test: Very good results, but just the slightest suggestion of a slow-down at the 3.6 GB and 3.85 GB marks. However note the faster speed of the transfer rate test performed on this disc; the blips occurred at about 15x speed.
Preliminary conclusion: Very good burn on a 16x-rated media type.
Note: Same booktyping of +R to DVD-ROM for compatibility.
DVD-R media ID: MCC 02RG20 (rated 8x speed)

Disc Quality scan:

Transfer Rate test:

Disc quality scan: nice low PI error max of 19. PI failures all 4 or less.
Transfer rate test: Perfect results with no slowdowns whilst reading up to 12x speed.
Preliminary conclusion: Excellent burn on an 8x-rated –R disc.
Notes: Interestingly the chipset responsible for the recording is revealed in this set of tests as being MTK DVDR MT1858. We’ll comment on this later.
DVD-R media ID: CMC MAG AE1 (rated 8x speed)

Disc Quality scan:

Transfer Rate test:

Disc quality scan: relatively very low PI error max of 21. PI failures all 4 or less except for a couple of spikes towards the end.
Transfer rate test: Perfect results with no slowdowns whilst reading up to 12x speed.
Preliminary conclusion: Excellent burn on an 8x-rated –R disc.
DVD+RW media ID: MKM A02 (rated 1-4x speed)

Disc Quality scan:

Transfer Rate test:

Disc quality scan: Good figure of max PI error of 27, and although most PI failures are less than 4, there are some spikes up to 5 and a max of 7.
Transfer rate test: excellent with no measurable drop in data transfer all the way up to 12x speed.
Preliminary conclusion: impressive results for a +RW, which characteristically tend to show higher errors than write-once media
Note: The DVDR3480 is NOT automatically book-typing the +RW disc to DVD-ROM.
DVD+RW media ID: MKM A03 (rated 8x speed)

Disc Quality scan:

Transfer rate test:

Disc quality scan: Very low PIE figure of 21 and exceptionally low PIF max of 3.
Transfer rate test: Perfect readback curve all the way up to 12x speed.
Preliminary conclusion: Excellent burn on a fast-rated +RW disc.
DVD-RW media ID: MCC 01RW4X (rated 4x speed)


Disc quality scan: Exceptionally low PIE figure of 12 and PIF max of 3.
Transfer rate test: Perfect readback curve all the way up to 12x speed.
Preliminary conclusion: Truly excellent burn on a -RW disc.
DVD+R DL media ID: MKM 001 (rated 4x speed)

Disc Quality scan:

Transfer Rate test:

Disc quality scan: Very low PI error rate until the layer change, when a large jump in reported errors occurs to a max of 272 (remember the ideal maximum of 280). Nevertheless the PI failure rate is exceptionally good; with nothing above 3 except for a single orange spike of 6 right at the end (which can probably be ignored as a scan artefact).
Transfer rate test: Excellent with no significant drop in data transfer across both layers, all the way up to 8x speed and back (the very slight fall at the layer break just before the 4 GB mark can be ignored).
Preliminary conclusion: Excellent results on this double-layer media. The significant jump in PI error rate can be mostly explained by the lower reflectivity of the second recording layer.
Note: The DVDR3480 is automatically book-typing the +R DL disc to DVD-ROM for compatibility.
DVD-R DL media ID: MKM 01RD30 (rated as 4x speed)

Disc Quality scan:

Transfer Rate test:

Disc quality scan: Extremely good burn for a dual layer disc (PIE of 33 and PIF of 3). Note the absence of a jump in PI errors after the layer change (compare it with the +R DL DQ scan above).
Transfer rate test: Perfect reading curve with no drive slowdowns.
Preliminary conclusion: One of the best burns in this review.
DVD+R DL media ID: MKM 03RD30 (rated as 8x speed)

Disc Quality scan:

Transfer Rate test:

Disc quality scan: Another very good burn for a dual layer disc (PIE of 23 and PIF of 3). Perhaps a suggestion of an increase in PI errors after the layer change but hardly noticeable.
Transfer rate test: Perfect reading curve with no drive slowdowns.
Preliminary conclusion: Another great DL burn.
Verdict on disc quality
We have shown from the above results how well the burn engine of the DVDR3480 records on a variety of blank media (physical construction, number of layers, dye types, and speed ratings). By keeping two factors constant – the recording device and the scanning drive - we would expect the observed PIE and PIF differences between discs to more likely reflect the quality of the burn on those particular media types.
Leaving aside these analytical restrictions, we chose a real-world premise for these tests. Most of these blank discs had been sitting around for several months (some over a year) in cake-boxes in a domestic environment, and moreover, we did the scanning on most of them a week after the recording was made. Thus although we took care to analyse the results carefully, the discs were chosen in keeping with how the recording situation might occur in real life.
Based on our limited testing parameters and results presented above, we can say that whatever the basic physical disc format; any of the single-layer write-once or rewriteable, or even the double layer disc types will be suitable for using in the DVDR3480. They all have slightly different recording/scanning characteristics but in our opinion there is not a bad burn among them. If we had a preference purely on burn quality alone then it would be the 8x rated –R 02RG20 for single layer write-once, the 4x -RW MCC 01RW4X for rewriteable, and for double layer; the 4x –R DL MKM 01RD30. However this is by no means the whole story, and the playback compatibility of these disc types in other standalone dedicated DVD players is also of importance. For example it is not possible to book-type the –R or –RW discs to DVD-ROM, yet some older DVD players may need this.
Scanning the recordings made on the –R format discs revealed the chipset used in the DVDR3480 as being a DVDR version of the MediaTek MT1858. This is of a family of devices that have recently been introduced with remarkable success into PC-based DVD rewriters; such as the LiteOn DH20A3, the Samsung 20x series, and the Sony DRU-840A amongst others. In particular the MT1858 series produces comparatively low jitter results when burning at low speed; which is an important factor in considering consistent video playback. Also we must remember that Philips and LiteOn are now collaborating (through their declared association as ‘Philips & LiteOn Digital Solutions Corp’ – PLDS), and so we would speculate that the hardware inside the DVDR3480 may well resemble a stock LiteOn PC unit.
Technical audio-visual characteristics of the DVD recording modes
We made some test recordings on the DVDR3480 to analyse the actual quality of the audio and video parts of the recordings. These were made from the analogue aerial input and consisted of ten-minute recordings at the six quality settings of the BBC sports coverage of a rugby match. We deliberately chose this fast motion material as a test of the variable bitrate strategy in order to maximise the differences between modes. The individual titles were ripped using DVD Decrypter in IFO mode and analysed using GSpot 2.7.0.1.

Note the change in bitrate as the recording quality drops, but the recorder still keeps a picture at full D1 resolution (720 x 576 PAL) even when recording at the 4 hour EP mode. This is a great improvement on recording quality normally found on most recorders, and highly unusual to find in a budget-priced recorder; certainly rivalling much more expensive machines such as Panasonic and Sony, and much better than older Philips machines where full D1 was maintained only as far as the SPP mode.
The shaded row at the bottom is to highlight that the SLP quality uses the MPEG1 standard rather than MPEG2, and the number of horizontal and vertical pixels are approximately each halved. The audio bitrate also drops.
Viewing comparison of recording modes
Tables and numbers are all very well, but what do these different recording modes actually look like to the viewer? To find out we made a series of short recordings at the different quality settings, of the same piece of high quality video fed in through the DVDR3480’s EXT2 input. The DVD player was connected to the recorder with a fully wired and insulated RGB SCART lead, and an original commercial pressed DVD-Video of ‘Cars’ used to generate a consistent picture quality for assessing the different recording characteristics.
The pictures produced by the various recording modes, starting with a screen shot of the original DVD-Video quality, are shown below for comparison. Areas to keep an eye on for MPEG compression artefacts are the right-hand side edges of the car (ghosting), the wire fencing links in front of the rear spoiler and later the windscreen (edge-effects), and the tuft of grass between the rear-right of the car and the tyre leaning to one side (loss of detail).


We can see a small drop in quality from the original DVD when HQ mode is used; mainly in the slight colour desaturation, some loss of detail with the grass behind the car, and the small gaps where the fence wires loop round each other. However there are hardly any noticeable compression artefacts such as blocking around the edges of objects, and the diagonal sections of the wire fence are not showing any jagged edges. Moving to SP mode shows the appearance of some artefacts around the fence wires with the car roof behind, but not significant loss of detail from HQ. At SPP mode there are now more compression effects appearing around the wire fencing in front of the car’s rear spoiler, and indeed these become quite obvious at LP mode. In EP mode the compression artefacts are stronger and more widespread; now clearly over the wire fencing across the car’s front window. At SLP mode there is a considerable change in quality, particularly resolution of detail: but remember this mode uses MPEG1 encoding and half D1 resolution (352 x 288) so that is to be expected. The static picture looks a mess but a moving image looks much better and may be quite acceptable for some purposes; for example viewing on a small screen such as a portable DVD player.
Naturally some of these differences will appear to be slight on a computer monitor, especially with the graphic constraints of this review; and a larger TV display will make them more obvious. Nevertheless our opinion is that the picture quality is still going to be very good at the lower recording quality settings, simply because the DVDR3480 maintains a screen resolution of 720 x 576 (PAL) all the way down to EP mode.
Mini-verdict
Overall we found the array of recording qualities available on the DVDR3480, and their recording quality, to be simply excellent for a budget DVD recorder.
Editing recordings made on the recorder
The DVDR3480 has some basic editing capabilities for recordings, but only for those made on rewriteable discs +RW or -RW. Previous Philips DVD recorders such as the DVDR880 onwards allowed a wider range of editing options on write-once +R media, as long as the discs hadn’t been finalised: for example you could divide a title, set chapter marks, or hide sections of the recording (eg adverts). Unfortunately none of this is possible on +R or –R discs in the DVDR3480, and before finalising a recording on these discs you are limited to protecting a title, adding/editing the name of it, and simply erasing a title. Of course if you erase something on a write-once disc, you don’t get the space back.
The DVDR3480 editing options are a little more flexible with rewriteable discs; in that you can divide a title and hide/unhide sections of the recording. Basically you select two time-points in the recording (‘A’ and ‘B’), then the bit in between gets hidden from playback (however do note that the disc space can’t be re-used either). All the details are covered in the manual, but below are four screenshots showing the very clear and intuitive menu arrangement for choosing a section of the recording to hide.
The first picture shows the editing display screen after choosing to hide a part of the recording:

The larger top video window is the whole title, and you navigate through it using the fast-forward (<FFW>) and fast-reverse (<REV>) buttons until you get to roughly where you want the first edit point to be. You can fast-forward up to 32x and it’s very quick. The scan speed is constantly displayed so you know how fast you’re going through the recording.

Pressing the <PLAY/PAUSE> button drops the playback down to 1x speed, and pressing it again stops it to a ‘pause’ state. From this point the <FFW> and <REV> buttons take on a much finer control to enable you to get to the exact edit point down to the group-of-pictures (GOP) level resolution: approximately half a second. Once you’re there, press <OK> and the edit point ‘A’ is set.
Exactly the same procedure is followed for setting the second edit point ‘B’:

Once the two markers ‘A’ and ‘B’ are set, pressing <OK> will make the recorder hide the section you have chosen; here marked in red on the timeline of the original recording window in the display:

If you later wish to unhide the section of recording, there is an option in the edit menu.
Mini-verdict
Once again this is a very intuitive on-screen display for hiding sections of recordings; very much like the kind of interface used on PC editing software. It also follows the pattern of other standalone DVD recorders such as Sony.
Playback of DVD-Video
As well as being a DVD recorder, the DVDR3480 is a fully-fledged DVD player. In addition to DVD-Video, Philips claim a wide range of additional playback options for various optical disc and video compression standards, but in this section we will look at standard DVD-Video playback.
Probably one of the first things to demonstrate is…
Making the recorder region-free
On receipt, our DVDR3480 was set to only play region 2 commercial DVD-Videos. However we easily found a hack which enables the DVDR3480 to become region-free. This is simple to apply, worked first time on the review machine and as far as we know; permanent. Even after applying the official Philips firmware upgrade discussed later, the region-free status was preserved. What we don’t know is how many region changes are allowed, before it becomes permanently set.
Anyway, here’s how to do it:
- Make sure there is no disc in the recorder.
- Press the <SETUP> button on the remote, then these four number buttons:
<5>, <0>, <1>, <8>
- A screen appears as below (we have highlighted the region code in red):

- The next number you press on the remote is the region code you want: so press <0> for region-free.
- Press the <OK> button and you should see the highlighted number change to whatever you selected.
- Press <SETUP> button again.
- That’s it.
Both before and after changing the region setting, we tried a wide range of DVD-Video discs in the DVDR3480; these ranged from commercial titles on pressed single and dual layer discs, through various home-made titles from digital terrestrial recordings, conversions from analogue video cameras made on previous Philips recorders, and even tried out a mini-DVD (DVD-Video files on a CD). All the DVD-Video titles we tried played fine and no problems were encountered.
The navigation options such as chapter jump (‘|<’ and ‘>|’ keys), fast-forward and fast-reverse all worked smoothly. Pressing the <FFW> and <REW> buttons successively accelerated the speed in doubling steps from 2x up to 32x. Philips have noted occasional problems with display-freeze problems when fast-forwarding through DVD-Video titles (and released a firmware upgrade to fix it), but before applying the firmware upgrade we did not encounter this problem in any of our DVD-Video tests. You may not find it necessary to upgrade the firmware.
Mini-verdict
Overall the DVDR3480 performed extremely well in the tests of DVD-Video playback, and we could not find any systematic problem with any of the discs we tried.
Playback of other compression formats from CD, DVD, and USB
To examine the alleged wide-ranging playback abilities of the DVDR3480, we decided to start off with a tough test; but one which should reflect the way that people want to use the machine’s playback in real life.
The starting point was a single 2.2 GB MPEG2 file which had been recorded from the DVB-T transmissions in the UK (Hauppauge card and DVB Viewer software). This file was known to have many non-DVD standard features, such as presentation time-stamp errors and non-standard group-of-pictures lengths, and so looked like a good test of the DVDR3480’s MPEG2 handling ability.
In addition to this file, several further encodings were made using the popular codecs listed below, and loaded onto various memory devices or burned onto physical CDs and DVDs. Womble MPEG Video Wizard was used for the MPEG1 & 2 transcodings, and FairUse Wizard 2.8 for MPEG4. Within the latter, the XviD codec version was X.XX and the DivX codec was DivX Pro version 6.8. Note that we tested all files in both PAL and NTSC encodings.
Results for the playback of these video files are given below:

‘â—’ = plays fine; ‘â—‹’= file recognised but won’t play; ‘x’ = file not recognised.
b/s = bitstream; GMC = global motion compensation; Qpel = quarter pixel
Playback from optical discs
Apart from the player not accepting video that was encoded with the more advanced DivX/XviD features such as GMC and Qpel – which to be honest we didn’t expect it to anyway – the range of AV formats handled by the DVDR3480 is impressive. In particular, the MPEG2 files that were recorded from UK Freeview transport streams were faultlessly played and showed no sign of problems with the differing and non-standard screen resolutions. For example, we tried several recordings at 720 x 576, 704 x 576, and 544 x 576 and at several group-of-pictures lengths; all of which worked without problem.
Similarly, all the MPEG4-based encodings such as XviD and DivX played perfectly with no sign of jumping. Older DVD players sometimes had problems with video encoded as a packed bitstream, but we found nothing to suggest the DVDR3480 was having difficulties with the files we made with this feature.
The usual navigation controls such as fast-forward and fast reverse worked fine on all MPEG-1, -2 and -4 encodings; in both directions up to 32x.
Playback via USB socket
The DVDR3480 accepts any USB1.1/2.0 compatible device in the front panel socket. To show how these things might physically fit, here’s a picture of a 256MB MemoryStick Pro Duo, sticking sideways out of a card adapter:

As you can see from the compatibility table further above, we found that anything that you can play on CD and DVD discs can also be played via the USB socket. This includes large external hard drives (we tried a 750 GB USB2.0 Seagate external drive formatted as FAT32) as well as 2 brands of Compact Flash cards, an SD card and three types of MemoryStick (standard, PRO, and PRO Duo).
On the recorder, when you plug a compatible device into the USB socket, a basic selection menu appears:

It’s fairly obvious what to do; just select the title you want to play with the arrow keys on the remote.
A significant finding was that a 4GB MPEG-2 DVB-T file recorded via a PC capture card and copied to a pen drive, played through from start to finish. Some DVD players will not manage this if the file is greater than 2GB in size and recorded on optical disc, so there is a clear advantage in having this alternative means of USB playback on the DVDR3480.
The only problem we found was in trying to fast-forward or fast reverse through an MPEG-2 file, when the machine locked up at anything over 2x in either direction. This is probably due to the USB port being the 1.1 standard and thus having a low maximum data rate: however if all you want to do is watch at 1x speed then things are fine and we did not come across any glitches during normal 1x playback. With the other types of video file – MPEG-1, XviD and DivX files - as expected with their lower bitrates you can be fast-forwarding and reversing to your heart’s content up to 32x.
Whilst playing back video through the USB port, you can get various items of information about the title by pressing the <INFO> button on the middle section of the remote:

This example (a villain with a stocking over his head, hence the peculiar skin tone) came from an MPEG2 DVB-T file at 544 x 576 pixels resolution, aspect ratio 4:3. The information panel shows, in order:
1. Type of file (‘MPEG’); 2. Time elapsed/remaining (‘8min 19 sec remaining’; notice the ‘minus sign next to the clock icon); 3. Which title is playing/number of titles (‘1/1’); 4. Which audio track is playing (‘Track 1’); 5. Subtitles On/Off (‘Off’); and 6. Repeat play (‘Off’). The bottom line greyed out showing ‘Time’ refers to the highlighted line.
For each line you can change the settings by selecting it, then pressing the <RIGHT> arrow button on the remote, and the options, if any, become available. A nice feature is that with the little info panel showing, the movie still keeps on playing in the background, so you don’t miss anything and can hear or see the selected changes; for example if you switch audio track.
Playback of audio compression formats
Separate audio file playback is generally considered to be a ‘supported’ rather than an integral feature of DVD recorders and players. Indeed the earlier standalone units from Philips and others had MP3 playback from DVD discs deliberately disabled in a collective commercial hesitance to be seen to be encouraging music piracy. These days a slightly more enlightened view means that some standalone DVD recorders and players support a wider range of compression formats and indeed physical media. To test the audio playback capabilities of the DVDR3480, we made several encodings of the same piece of music, using different methods of compression across the range of storage media.
Philips specifications state that the DVDR3480 only recognises MP3 (MPEG1 Layer III; .mp3) and WMA (Windows Media Audio; .wma); but because some people like to rip the audio track from a music video, we included MPEG1 Layer II (.mp2, the DVD-Video standard audio stream), and AC3 (Dolby Digital multichannel; the audio stream on many commercial DVD-Video).
To test other audio compression formats not listed by Philips, we also tried FLAC (lossless public domain encoder; .flac), Ogg-Vorbis (.ogg), and AAC (Advanced Advanced Audio Codec; .mp4) as used in iTunes.
Results for the playback of these audio files are given below:

‘â—’ = plays fine; ‘â—‹’= file recognised but won’t play; ‘x’ = file not recognised.
b/s = bitstream; GMC = global motion compensation; Qpel = quarter pixel
Mini-verdict
The MP3 and WMA encodings are fully catered for across the audio playback inputs for the DVDR3480. A handy addition is the recognition and playback of MP2 files; so the audio streams of digital broadcast material can be ripped and played without modification or quality loss. However AC3 audio cannot be used directly and would need transcoding to another format first.
Playback of still pictures
We will just briefly review the still picture display capabilities of the DVDR3480. This feature could be useful if you go out for a walk, take some photos and come back wanting to see what they look like. Rather than fire up the PC and download them, you can just take out the card from the camera and plug it into the DVDR3480 (with a suitable adapter of course). Alternatively, if the camera supports its memory as a mass storage device, then you can just plug the camera directly into the front panel. Note that the DVDR3480 does not accept a connection via a USB hub; it must be a direct one.
Despite the Philips manual stating that only JPEG files would be recognised and displayed, we tried a number of different image file formats: JPEG, bitmap (BMP), portable network graphics (PNG), tagged-image file format (TIFF), and graphics image format (GIF). In fact Philips were correct: the only one which was recognised and displayed was the JPEG files.
There is a basic selection screen very similar to that for music files and most of the control options for viewing the pictures are listed at the bottom of the screen:

So by pressing the <ANGLE> key, images within a folder are displayed as an index of thumbnails:

The thumbnails can be selected using the arrow keys on the remote, and then pressing <OK> plays the slideshow. At any time the sequence can be stopped by pressing the <PAUSE/PLAY> button on the remote, then moved backward and forward using the ‘|<’ and ‘>|’ keys; just like a video really.
After selecting a picture, you can expand it on the screen using the <ZOOM> key on the remote control; to values of 125%, 150%, and 200%; after which it cycles back to normal (100%). Whilst zoomed in, you can pan up/down/right/left using the arrow keys.
If there are MP3 files on the same disc or pen drive, you can also have music playing back at the same time by selecting this first before starting the slideshow.
Mini-verdict
Altogether the DVDR3480 has a simple and effective way to display pictures from a memory device, as long as they are in JPEG format.
Conclusions
Overall, we think the DVDR3480 is remarkable value for money. It definitely fulfils the need of consumers who require a no-nonsense and reliable approach to recording the output of unprotected cable, satellite, or free-to-air broadcasting programmes. The operating procedures are well-described and implemented in the menus and other interfaces of the recorder. Of particular note is the excellence of burn quality, great MPEG2 recording quality, plus the full-D1 resolution down to the last-but-one compression setting.
In addition, the recorder seems to incorporate the best playback facilities of Philips standalone DVD players, in accepting a wide range of input devices, optical media and AV formats and having a progressive scan component output.
And if that’s not enough, you get a guarantee that includes a replacement recorder should you need it.
Positive points:
- Solid construction of the unit.
- Home Premium Guarantee (replacement machine if necessary within 7 days)
- Vastly improved remote control from previous Philips recorders.
- Simple and effective interface, which is consistent across all functions.
- Excellent writing performance on a wide range of DVD media.
- Excellent quality of MPEG2 recording from external RGB sources.
- Full screen resolution even when recording in 4-hour mode.
- Wide range of video playback from disc and USB socket.
- Better than expected range of files for audio playback.
Well implemented JPEG still image display and slideshow facility.
Negative points:
- No manual chapter marking (contrary to information on the Philips website)
- No VideoPlus or VPS/PDC
- Remote control arrow buttons were a bit irritating.
Overall this recorder is excellent value for money, and accordingly we award it our CD Freaks 'Editor's Choice’ category.
.png)
We found the best price available in the UK at the time of writing the review, to be at cheapestelectrical.co.uk, for £59.99 inc VAT.
You may comment on this review below or in this forum thread.