 |
Review: Verbatim |
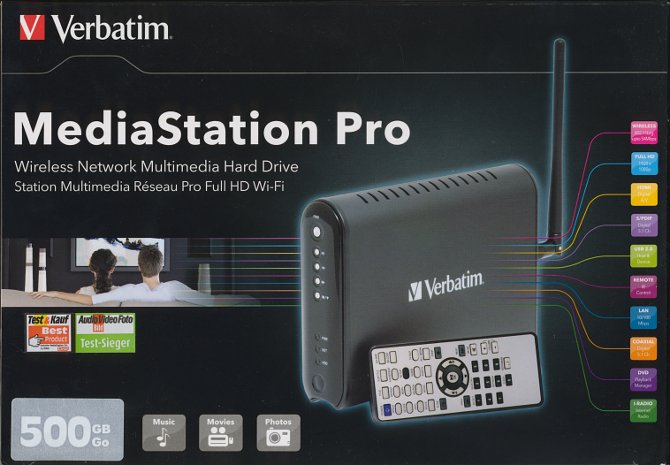
Verbatim was kind
enough to lend us their MediaStation Pro 500GB for review. This is a compact High
Definition wireless network media player roughly the size of a 3.5” external
hard disk, which can operate horizontally or vertically with its included stand.
The media player features a 500GB internal hard disk, network streaming
capabilities via Wi-Fi or wired network and can play from an attached USB
drive.
According to is
specifications, it can play a variety of music, picture and video formats
including DVD folders and output the video up to Full HD (1080p) with its HDMI
output.
Company
Information

Products to Meet the
Demands of Performance Computing
Since its beginning in
1969, Verbatim® has been at the forefront of the evolution in data storage
technology. Today, more than 40 years later, Verbatim remains one of the most
recognisable names in the data storage industry. Here is the profile of
Verbatim that you can find on their website.
Drive
Specifications
We obtained the
specifications of the MediaStation Pro from the retail packaging it came in as
well as the Verbatim website:
|
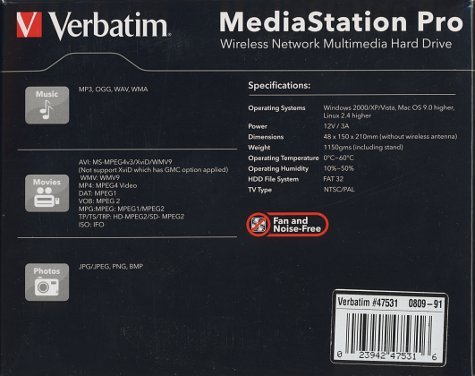
Supported file types |
|
|
Music |
MP3, OGG, WAV, WMA |
|
Movies |
AVI: MS-MPEG4v3/XviD/WMV9 (Does not support XviD which has GMC option applied) WMV: WMV9 MP4: MPEG4 Video DAT: MPEG1 VOB: MPEG2 MPG/MPEG: MPEG1/MPEG2 TP/TS/TRP: HD-MPEG2/SD-MPEG2 ISO:IFO |
|
Photos |
JPG/JPEG, PNG, BMP |
|
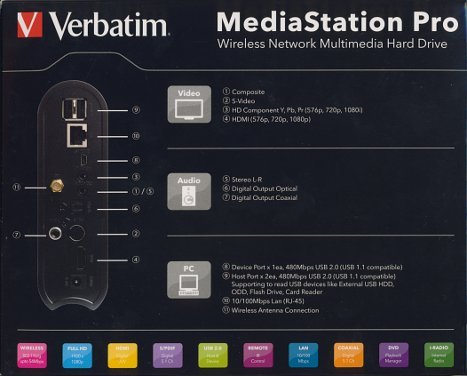
Connectivity |
|
|
Video |
Composite S-Video HD Component Y, Pb, Pr (576p, 720p, 1080i) HDMI (576p, 720p, 1080p) |
|
Audio |
Stereo L-R Digital Output Optical Digital Output Coaxial |
|
PC |
Device Port x 1ea, 480Mbps USB 2.0 (USB 1.1 Host Port x 2ea, 480Mbps USB 2.0 (USB 1.1 Supporting to read USB devices like External USB 10/100Mbps LAN (RJ-45) Wireless Antenna Connection |
|
Other Specifications |
|
|
Operating Systems |
Windows 2000/XP/Vista, Mac OS 9.0 higher, Linux 2.4 |
|
Power |
12V/3A |
|
Dimensions |
48 x 150 x 210mm (without wireless antenna) |
|
Operating Temperature |
0°C~60°C |
|
HDD File System |
FAT 32 |
|
TV Type |
NTSC/PAL |
|
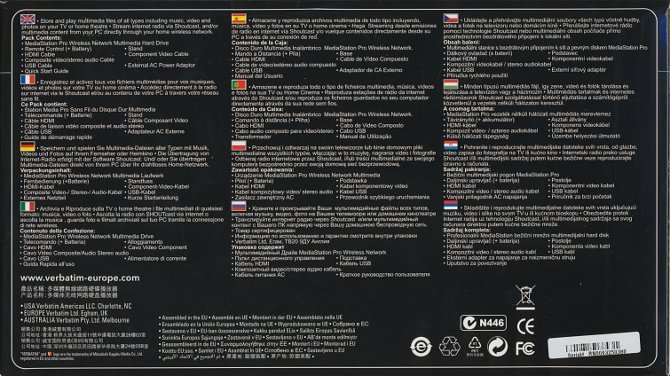
Pack Contents |
MediaStation Pro Wireless network Multimedia Hard Remote Control (+ Battery) HDMI Cable Composite video/stereo audio Cable USB Cable Quick Start Guide Stand Component Video Cable External AC Power Adapter |
What’s
inside the box
Let us first start by
taking a look at the retail packaging as well as what the drive ships with.
The following images
show the retail box this drive came shipped in.
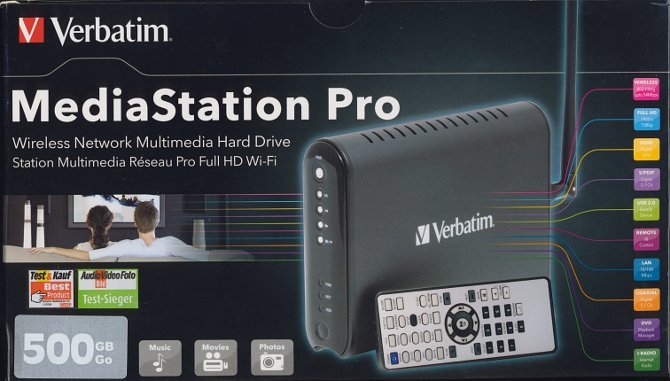
Front side
Left Side
Right Side
Rear Side
Top of box
The contents of the package are as follows:
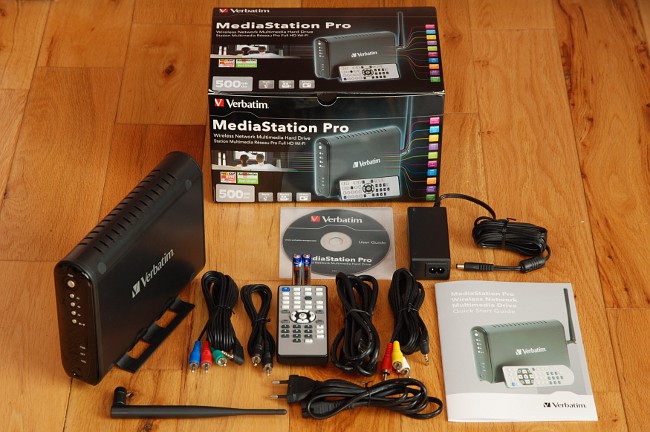
The retail bundle consists of:
- MediaStation Pro 500GB
- HDMI cable
- 3x (Yellow / White / Red) Phono/RCA to 3.5mm lead
- 1x (Black) Phono/RCA Coaxial lead
- 3x (Red / Green / Blue) Phono/RCA to 3.5mm lead
- Wi-Fi aerial
- Mini-USB cable
- DC Power Adapter
- Stand
- Remote control including batteries
- User manual on CD (multiple languages)
- Quick Start Guide
This player includes
all the necessary cables to set this up with just about any type of display this
player supports and most sound systems, with video cables catering for HDMI,
Component, Composite video and audio cables covering analogue and digital
audio. A mini USB cable is included for accessing its hard disk from a PC.
Note that as with almost any media player sold internationally, these cables
may vary depending on the country of purchase, especially the power lead.
Those interested in connecting this to a wired network will need to get an RJ45
network patch cable.
The bundled analogue
audio/composite and component video cables both have a 3.5mm plug at one end,
at least with this review sample, so these cables would be difficult to
replace. However, its HDMI video and digital coaxial/optical audio connections
are both standard.
Now let us take a look
at the MediaStation Pro itself, along with the back of the unit:
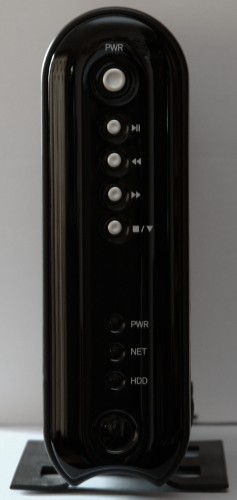
The physical size of
the player is about that of a 3.5” external desktop hard disk. The player has
a blue power LED at the top and three red LEDs near the bottom for power,
network and hard disk. Both power LEDs illuminate when the player is powered
up, although the top blue one can be forced off from the setup menu. The
network LED flashes during network activity and the HDD LED flashes during hard
disk activity. There are no other indicators or digits on the front. The
buttons provide basic navigation, enough to browse through the media menus and
basic playback operations. The larger button at the top is the standby
button.
The following shows an
example of the two power LEDs lit when the unit is powered up:

The LEDs are bright
enough to see during the day, but not too bright to become an eye sore when
watching TV in a dark room.
Now let’s take a look
at its connections:
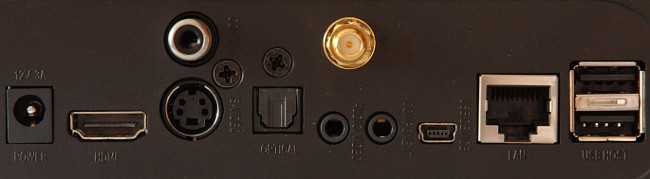
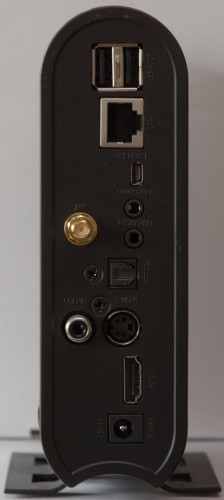
The rear of the media
player has the following connections:
- SPDIF OUT
- Coaxial – Digital out for a digital amplifier with a coaxial input
- Optical – Digital out for a digital amplifier with an optical input
- Video (3.5mm) – Composite audio & video out for legacy equipment that does not have HDMI or digital audio input. The included cable converts this to 2xPhono/RCA Audio + Phono/RCA video plugs.
- S-Video – Video out for legacy equipment that does not have HDMI or component video input, but has S-Video input.
- Component (3.5mm) – Component video output for higher quality video on displays with component video input, but which lack HDMI input. The included cable converts this to 3xphono/RCA (Y / Pb / Pr) plugs.
The unit does not have
any exhaust fan, yet remains cool to the touch. Apart from a faint spin-up
sound of its HDD, the unit appears to be completely silent, at least in our
environment. If the front power LEDs were not present, it would be difficult
to tell whether the unit is running apart from in a very silent room.
Finally, let’s take a
look at the remote control:
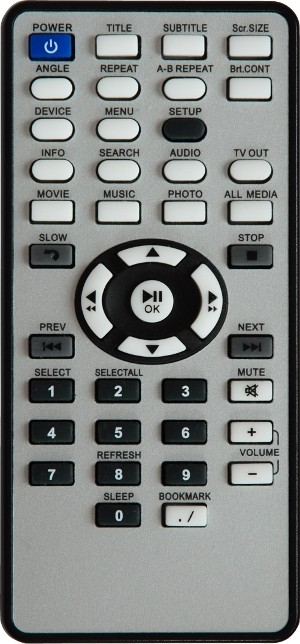
The remote control is
quite small. While the remote contains a wide range of direct-access buttons,
we found the top buttons quite cramped from our usage throughout the review. For
example, try finding the “Menu” button above.
Even after we got an
idea where all the buttons where, we still often ended up pressing the wrong
button at times, such as “TV Out” instead of the “All Media” button. The
buttons do not glow or illuminate in the dark, which is where we really found
it most awkward to use apart from the regular navigation operations in the
middle.
Test
Equipment
As this is a standalone
media player which is not dependent on a PC to operate, the only things
important in this case are what were used to test the unit and capture the
images.
Displays:
- BenQ FP241W 24” 1920x1200 Full HD monitor*1
Capture devices:
- Hauppauge HVR4000 (for screenshots)
- Nikon D60 DSLR (for photography)
Notes:
*1 While the Concept
Media Giant Pro (previous review) was not compatible with this display, the
MediaStation Pro properly supports its HDMI EDID info. This means we are able
to test out all its standard and high definition modes up to 1080p in both NTSC
and PAL.
Features
and techniques
 The following are the
features of the Verbatim MediaStation as found at the Verbatim website:
MediaStation
Pro Wireless Network Multimedia Hard Drive - 500GB
Product Number: 47531
Capacity: 500GB
Store and play
Multimedia files of all types including music, video and photos
on your TV or
home theatre.
Stream internet radio via Shoutcast or Icecast, and/or multimedia content
from
your PC directly through your home wireless network.
Wireless Connection:
Supports IEEE 892.11g (54Mbps), with
5dBi antenna that provides high quality wireless connections.
Internet Radio:
Shoutcast & Icecast compatible.
Easily access radio servers over the internet for hundreds of online radio
stations in digital quality.
HDMI - High Definition Multimedia Interface
Digital connection of video and audio
1080p.
FTP File server function:
Provide access to storage via
network. You can connect to other online computers or directly play multimedia
content.
USB 2.0 Host Function:
Connect flash drives, card readers,
portable hard drives.
Digital Audio 5.1:
For connecting to home theatre
devices that support Dolby Digital or the DTS surround sound system.
MediaStation Pro User Interface:
Easy file/folder navigation.
Privacy:
Protect certain content via a
password.
Video Support:
MPEG 1,2,4 / MP4 / DivX 3,4,5,6 (AVI) / HD-MPEG2 / SD-MPEG2 / XviD (except GMC,
Qpel option applied) / WMV9 (WMV) / TS/TP/TRP / ISO / IFO / VOB
Music Support:
MP3 / WMA / WAV / OGG Vorbis
Photo Support: JPG / JPEG / PNG / BMP
Verbatim Two Year Limited Warranty
Setting
up the Verbatim MediaStation Pro
This player does not
feature a setup wizard, which means that it does not go through any special
process when switched on for the very first time.
When powered on, the
unit takes about 30 seconds to initialise, displaying the following screen
after a few seconds of switching on:

As the player has a
choice of outputs and its default video-output mode may not be compatible with
the connected display, the video output mode can be switched by pressing the
“Video Out” button on the remote. This button can also be used to select the
output when moving the player between TVs without worrying about setting the
correct output mode before switching TV.
After the player
finishes initialising, the following screen appears:

Without making any
configuration changes, the player is ready to use, assuming the user has a
standard definition TV with stereo speakers, a USB drive or DHCP enabled LAN
source with content to play.
For first time
configuration, most users will likely need to configure the following through
the setup menu:
- Language
– If the user interface is not in their native language. - Video
Out – For choosing the best mode for the display. - Wireless
– Set up the player with a Wi-Fi network - Aspect
ratio – To match the display or enable pan & scan. - Internet
– Internet connection, e.g. for streaming radio.
Setup
Menu
The set up menu can be
brought up by pressing the ‘Setup’ button:

Unlike previous media
players we’ve seen, this player has all setup items on a single category.
Navigation is carried out using the directional arrows and pressing the ‘OK’
button goes into the selected item. When an item is highlighted, the player
gives a short description of what this item is about, such as shown in the
image above. The player has a very quick response time to the remote with no
noticeable delay changing most screens or going into and out of submenus. The
only delay we encountered was exiting out of the configuration, where the
player takes a few seconds to save its settings.
When we go into an
item, the player gives a list of configuration options for that item:

For multi-choice
options, the choices are listed to the right as shown above. Greyed out items
cannot be edited until the chosen option causing these to be greyed out is
changed. One nice thing about the configuration menu is that even if we choose
an option that causes other options to be greyed out, their values are retained
even after we leave the menu. For example, if we had the player set up as an
FTP server and later disable this feature, causing the username & password
fields to grey out, these details are retained the next time we enable the FTP
server. The left arrow navigates out to a parent menu.
To give an idea of the
configuration options available, the following is a breakdown of the setup
menu, sub-menus and options:
Video Out
TV Type
Choice of: NTSC or PAL
TV Out
Choice of: Composite, Component or HDMI*
C/S-Video
Choice of: C/S-Video or Cy/Pb/Pr
Component
Choice of: 480i, 480p, 576i, 576p, 720p or 1080i
HDMI Modes (may vary depending on display)
Choice of: 480p, 576p, 720p, 1080i or 1080p
Audio Out
Audio Out
Choice of: Stereo or Encoded Digital
Network
DHCP Support
Choice of: On or Off
IP Address (x.x.x.x field)
Subnet (x.x.x.x field)
Wireless-1
AP Scan (Lists APs)
Network Type
Choice of: AP Mode or AD hoc
DHCP Support
Choice of On or Off
IP Address (x.x.x.x field)
Subnet (x.x.x.x field)
Channel:
Choice of: Channel1 … Channel13
SSID: (text field)
Security Mode:
Choice of: OFF, WEP, WPA-TKIP or WPA-AES
WEP key type:
Choice of: 64Bit HEX, 128Bit HEX, 64Bit ASCII or 128Bit ASCII
WEP password: (text field)
WPA password: (text field)
Use Wireless:
Choice of: OFF or ON
Folder Lock
Private Folder:
Choice of: On or Off
Change Password
LED
Power LED
Choice of: ON or OFF
Photo View
BGM: ON / OFF
Slide Show:
Choice of: 1, 2 ... 10 Sec
Effect:
Choice of: None, Slide, Zoom In/Out, Fade In/Out or Random
Language
Language:
Choice of: English, French, German, Italian, Portuguese
or Spanish
Scr. Rate
Screen Size:
Choice of: 4:3 Letterbox, 4:3 PanScan or 16:9
Auto Play
Autoplay:
Choice of: ON or OFF
Internet
Internet Connection:
Choice of: Wired or Wireless
DHCP Support:
Choice of: ON or OFF
Gateway. (x.x.x.x field)
DNS 1: (x.x.x.x field)
DNS 2: (x.x.x.x field)
Connection test
i-RADIO
Server list:
Choice of: OFF or Shoutcast
Buffering:
Choice of: 30 Sec, 1 Min or 5 Min
No. of server(s):
Choice of: 10, 20 or 30
Skin
Skin Support:
Choice of: ON or OFF
Skin folder:
Choice of: skin1, skin2 ... skin10
User color file:
Choice of: ON or OFF
Font Color:
Choice of: Black, Silver, Gray, White, Salmon, Deeppink,
Purple,
Blue, Skyblue, Indigo, Green, Lightseagreen, Yellow or Sandybrown
Selected Font color:
Choice of: Black, Silver, Gray, White, Salmon, Deeppink,
Purple,
Blue, Skyblue, Indigo, Green, Lightseagreen, Yellow or
Sandybrown
etc.
Intro / Sound Effect:
Choice of: ON or OFF
Loading Message:
Choice of: ON or OFF
Index loading time:
Choice of: “when file plays” or “during time search”
Screen Saver:
Choice of: OFF, 1 Min, 5 Min or 10 Min
Screen Saver while playing Music:
Choice of: ON or OFF
Protocol
Select Protocol:
Choice of: SAMBA, UPNP, NFS or FTP
SAMBA Server:
Choice of: AUTO or MANUAL
SAMBA Server Address: (x.x.x.x field)
NFS Server Address: (x.x.x.x field)
NFS Shared Folder: (text field)
FTP Address: (x.x.x.x field)
FTP ID: (text field)
FTP Password: (password field)
FTP Port: (numeric field)
FTP Passive: (tick field)
FTP
FTP Client Save-To Path: (text
field)
Use FTP Server:
Choice of: ON or OFF
FTP Server Save-To Path: (text field)
Server ID: (text field)
Server Password: (password field)
Server Port: (numeric field)
* For the video setup,
the player does not allow “HDMI” to be chosen unless it is connected to a HDMI
display. The HDMI modes we listed above will vary depending on the EDID info
provided by the display.
Setting
up Wi-Fi
As this player is
designed to operate on Wi-Fi, especially with its included high gain antenna,
the first thing we did was configure the player for Wi-Fi. This turned out to
be a fairly straight forward process. First, we went into the Wireless
configuration option, set the “Use Wireless:” option to ‘On’ and chose the “AP
Scan” option. After we chose our home network, the player set DHCP to “On” and
filled the Channel & SSID fields automatically:

For the encryption, we
had to select the encryption type and enter the key. The following shows the
encryption choices available:

Like with the wired
network, once the Wi-Fi connection is up, its icon shows up in colour on the
main menu.
Media
Browser
The media browser shows
up automatically after powering up. The initial screen lets the user choose a
media source. If a source is not available (e.g. no USB drive plugged in), it
is greyed out:

The media browser is
very straightforward to use, right-arrow goes into an option, left-arrow goes
back to the source selection and up/down arrows to select an item and ‘OK’ to
go into a folder or begin playback of a selected file. Unlike some media
players we’ve used, this player has a quick interface and just about every
folder/page loads up straight away, which means there is no tedious delay
scrolling through multiple pages or directory levels. The only time there is a
delay is when opening a network drive, a very large folder or browsing a
spun-down hard disk which needs to spin up again.
By default, the player
lists audio, video and picture files with recognised file extensions:

As shown above, when a
file is selected, its path, size and date are shown. The path is shown in the Linux
format.
The files shown can be
narrowed down to audio, video or pictures only by pressing the media type key
on the remote. For example, pressing “Photo” will show image files only:

What’s nice here is
that one does not need to return back to the main browser to choose the content
type, not to mention the tedious page loading times some media players have to
navigate back.
Playlists
With the capacity to
store hundreds of songs, photos and videos, some users would like to have
selected files played back in a certain order or have the player playback files
randomly from a certain selection. With most media players, one way to do this
is to put the selected files in a folder. However, this means having to
prepare the folder from a PC each time. The MediaStation overcomes this with a
playlist feature.
To create a playlist,
we basically select the files we’re interested in. This can be a combination
of music, pictures, video and can includes files from different folder levels
and network shares:

Once we’ve made our
selection, we go into the menu and select “Playlist”:

From here, we can begin
playback or make adjustments to the playlist. When photos are played back,
they are shown for the duration configured as for showing a slideshow.
The ability to put
videos in a playlist is very useful for those with a music video collection and
would like to play or shuffle these just like with an MP3 collection. Very few
media players we have encountered will play more than one video in sequence and
this is the first media player we have encountered that allows a mixture of
audio, video and photos in a playlist.
As far as we can tell,
there is no option to save a playlist.
Network
Browsing
Browsing a network
works much like browsing a network on a PC. First we go into the network
source (LAN or Wireless), select the PC and then the network share to go into:

Once in a network
share, navigation works in the same way as browsing USB/HDD:

A drawback we
encountered with network shares is that the player can only access non-password
protected network shares where the ‘Guest’ account has been enabled on that
PC. With Windows XP, this is simple enough to do. We enabled the guest
account, enabled file sharing in the Windows firewall and enabled sharing on the
folders we wanted to access from the player. When the player is switched on,
it usually takes a few minutes before we can browse the network. Despite the user
manual claiming that the Windows firewall must be disabled, we had no issue
playing back from shares with the firewall on, as long as we enabled file
sharing on the firewall for the network subnet. We haven’t tested the player
with Windows Vista shares.
However, we were unable
to connect to any Windows 7 shared folders no matter how we configured them,
including disabling the firewall, enabling guest access, ensuring the folders
have guest and ‘Everyone’ permissions, etc. as well following the guide for
Windows Vista in the user guide. Sure we had no problem accessing these
network shares from other PCs without a password, but the following message
appears when we try to browse a Windows 7 PC from the MediaStation:

For those using Windows
7 or who prefer not to have a guest account set up, we have no issue sharing
folders using Windows Media Connect. We will cover this on the next page.
Playback
Features
While playing content,
whether music, video or pictures, the MediaStation has some useful features to
control playback or show extra information. For example, the Player can easily
jump to a given section within a track in which it would take a while even with
its highest fast-forwarding speed. As each type of content has its own type of
navigation, this section broken down into three sub-sections to cover Video,
Music and Photos. Most of the playback features are available directly as keys
on the remote control.
Video
File Controls
The playback controls
differ between when playing video files and a DVD folder, so to start with,
we’ll look at the controls available when playing a video file.
The time it takes to
begin playback varies depending on the content type. MPEG2 and WMV files
typically start within 1 to 2 seconds of pressing play. Most XviD files take 5
to 10 seconds. DivX files take as long as 15 seconds to begin playback. During
the loading time, it is not possible to stop playback or carry out any
operation. If the unit tries playing an unsupported file, it will display an
error and then begin playback of the next supported file.
Most of the playback
controls can be directly accessed from the remote. Some controls can also be
accessed from the menu. The only menu-only options we came across are the play
order and aspect ratio controls:

From the menu, we get
the following options:
- Info – Displays file and codec information (see below)
- Search – Jumps to the entered time or slider point (in steps of 30 seconds).
- Subtitle* – Displays a menu to select the subtitles, set the position, sync, colour, language and size.
- Size – Displays a menu with the following options:
- Magnify Fully – Stretches the picture to fill the screen.
- Scr. Zoom – Zooms in/out in small steps.
- Scr. Position – Moves the picture up/down and left/right.
- Default Size – Restore the picture to its default size.
* Despite trying
several video clips with subtitles, we were able to choose the language and
subtitles to show, but no subtitles were displayed. When we went back into the
menu to try setting the position, colour, etc., it told us that no subtitle was
selected.
The screen zoom and
position controls work much like those on a monitor, where we can finely zoom
in/out and reposition where the picture is shown. This is very useful for
playing video files which have black borders on all four sides, as a 16:9 movie
encoded with black borders in a 4:3 picture and then shown on a 16:9 screen. The
following shows an example where we have a video off centre and with an excess
border around the image. The right image is corrected using the zoom/position
tools:

Of course we can zoom
in more to further reduce the top/bottom borders at a cost of cropping the
sides. The same can be done vice versa to show more of the picture on TVs that
overscan too much.
The info option/button
displays information about the file being played. The following shows an
example:

On the remote, extra
controls function as follows from our testing:
- Bri.CONT – Adjusts the contrast, brightness and saturation.
- Slow – Slows the playback to speeds of 1/2x, 1/4x or 1/8x.
- Up/Down arrows – Turns up/down the volume respectively.
- Rewind – Rewinds in speeds of 8x, 16x or 32x.
- Fast Forward – Goes forward in speeds of 8x, 16x or 32x.
- Prev – Goes to previous file.
- Next – Goes to next file.
- Repeat – Changes the repeat method between “Track”, “All” and “Clear”.
- Play/Pause – Plays/pauses playback.
- 4 – Jumps back 10 seconds.
- 5 – Skips ahead 10 seconds, useful for finding a particular scene or skipping an ad-break.
- 0/Sleep – Goes to standby after 10, 20, 30, 60, 120, 180 or 240 minutes or when file ends.
Depending on the video
being played, the player stopped responding intermittently after various fast
forward, rewinding and jump forward/back operations. Each time this happened,
the picture froze and we had to restart the player. For a video that was
playing back from a USB source, simply unplugging the USB drive is usually
enough to make the player respond again.
Another thing we found
a little annoying is that when we pause the video, it takes up to 5 seconds to
resume playback. During this delay, the player does not show any sign of
response and pressing the play button a second time will cause playback to
pause again, adding another 5 seconds of delay.
If we stop playback and
later play a file we played earlier, the player gives the option of resuming
playback or starting over. The player will remember the last playback position
of multiple files even after the unit is turned off. Another option to resume
playback at a later time is to make a bookmark. The following shows an example
of the bookmark list:

Playing
back a DVD folder or ISO
The controls behave
quite differently when playing a DVD ISO/Folder compared to playing a video
file and some of the extra features such as fine-zooming/positioning are not
available. To begin playback, we simply play the ISO file or the
“VIDEO_TS.IFO” file for a DVD folder.
The controls on the
remote function as follows:
- Title – Returns to title menu.
- Subtitle – Changes between subtitles (if available.)
- Scr.SIZE – Zooms in by 2x, 4x or 8x.
- Angle – Changes between angles (if available.)
- Repeat – Repeats the current chapter or title.
- A-B Repeat – Sets the ‘A’ & ‘B’ points to repeat between.
- Bri.CONT – Adjusts the contrast, brightness and saturation.
- Menu – Returns to the main menu.
- Info – Displays info about the current playback.
- Search – Jumps to the specified Time, Title and Chapter.
- Audio – Switches between soundtracks (if available.)
- Slow – Slows the playback to speeds of 1/2x, 1/4x or 1/8x.
- Rewind – Rewinds in speeds of 8x, 16x or 32x.
- Fast Forward – Goes forward in speeds of 8x, 16x or 32x.
- Prev – Goes to previous chapter.
- Next – Goes to next chapter.
- 0/Sleep – Goes to standby after 10, 20, 30, 60, 120, 180 or 240 minutes or when DVD ends.
The player responds
much better to operations when playing a DVD than a standalone file, especially
during navigation and resuming playback.
The info button brings
up information about the current chapter playing back as well as a few configuration
details:

As the player functions
in pretty much the same way as a dedicated DVD player while playing a DVD
ISO/Folder, we’ll not go into any further details of these features/functions.
Music
Control
Like playing back video
files, we can access a menu with a handful of options as well as perform a
handful of operations directly from the remote.
The following shows the
playback menu:

From this menu, we get
the following controls:
- Info –
Displays information about the song (see below) - Search
– Jumps to the specified time or percentage. - Sequence – Changes between sequence and random play.
- Repeat
– Changes between Repeat one, All and Off.
The info option/button
displays information about the playback settings and current song, such as the
tags from a playing MP3:

There are also a
handful of controls available directly from the remote:
- Up/Down arrows – Turns up/down the volume respectively.
- Rewind – Rewinds in speeds of 8x, 16x or 32x.
- Fast Forward – Goes forward in speeds of 8x, 16x or 32x.
- Prev – Goes to previous file.
- Next – Goes to next file.
- Repeat – Changes the repeat method between “Track”, “All” and “Clear”.
- Play/Pause – Plays/pauses playback.
- 0/Sleep – Goes to standby after 10, 20, 30, 60, 120, 180 or 240 minutes or when file ends.
Like playing a video
file, the player does stutter when navigating through a song and takes a few
seconds to resume playback when paused.
When a partially played
song is later played, the player gives an option to resume playback. While
this may not seem useful at first, it does come in handy when listening to
audiobooks and podcasts. Like video files, the player also supports
bookmarking audio files.
Photo
Control
When viewing photos,
the player automatically plays them as a slideshow. In the main setup menu,
there is a “Photo View” option for specifying whether to have background music,
the time per slide and the display effect to show when opening a new slide:

For background music,
we need to create a folder on the internal hard disk called ‘music’ and place
the music files in there to play in the background.
During playback, most
of the photo options are accessed from the menu:

The menu options
function as follows:
- Info – Displays information about the current picture (see below.)
- Slide Time – Sets number of seconds between slides (1 to 10 seconds.)
- Pos. – Moves the picture up/down and left/right.
- Size – Zooms in/out.
- Rotate – Rotates the picture (if small enough.*)
- Play Order – Changes the playback between Random and Sequential.
* From our testing, if
the picture is larger than 800 x 600, the player will display an error about
not enough memory when attempting to rotate it.
The info menu
option/button shows information about the current photo, including some EXIF
info:

When the photos are
shown as a slideshow, we did encounter the following two issues:
- The
slide must show for the slide time before the player responds to any key.
For example, if the slide time is 10 seconds, it takes up to 10 seconds to
stop the slideshow, go into the menu, etc. - If
we try going into the menu, the menu appears after the next slide is
shown.
From our experience,
unless the slideshow needs to run unattended, playback mode should be set to
“Play One” to eliminate the response time when navigating, going into the menu,
etc. Once a picture is displayed, the player is very responsive to zooming
in/out and navigating around the picture while zoomed in. The zoom operation
goes in fine steps, so it takes roughly 10 seconds holding the right-arrow key
to zoom fully in on a 6 Megapixel photo.
Like playing video and
audio files, it is also possible to bookmark pictures. This can be useful when
viewing a large set of photos and would like to continue viewing where left off
at a later stage.
Hard
Disk USB Access
Like most media
players, the hard disk can be directly accessed through its mini-USB
connection. This is also the quickest way to transfer data to or from the
player. When in standby, the hard disk takes about 15 seconds to show up on
the PC. If the player is already powered up, it shows up straight away when
plugged in. The player cannot be operated while the USB is connected. Once
the USB is disconnected, the player goes into standby and spins down its hard
disk.
When connected, it
shows up just like any other USB external hard disk:

Going by Windows’ disk
management, the hard disk does not contain any other partitions. Its internal
hard disk shows up as a "Samsung HD502HI" in device manager and HD
Tune Pro, which going by a Internet search appears to be a Samsung F2 EcoGreen
5400RPM SATA hard disk:

As HD Tune shows, the
hard disk has a pretty quick read transfer rate of 31.6MB/s average. As its
hard disk came preformatted as FAT32 and we are unsure if it needs to be
formatted in a certain way, we did not perform any write benchmarks with the
drive. Instead, we timed how long it takes to transfer a DVD5 size DVD folder,
which gives an idea of how fast large files can be transferred:

In this test, the write
speed was 1719.843MB/min and the DVD folder took 2.5 minutes to transfer, which
works out at 28.7MB/s write average. Based on this speed, this means a typical
700MB CD size film will take just over 24 seconds to copy.
Hard
Disk FTP Access
Another way to access
its hard disk is through an FTP connection. This can be configured through the
setup menu:

Once set up, we can
access the player using an FTP client, such as FileZilla:

The player only allows
a single FTP connection, so the FTP client must be configured to a maximum of
one simultaneous connection for this connection. While Windows does have its
own FTP client, it will attempt multiple FTP connections even when trying to
transfer a single file. When we tried transferring files through Windows
Explorer, it repetitively kept asking for the logon details.
When an external USB
drive is connected the FTP server can be configured to use it instead of the
internal hard disk. This is useful for when the player is hooked up to a 3.5”
external hard disk, where it or its power supply is awkward to disconnect each
time the user wishes to make changes to its content. By configuring the FTP
server to use it, the user can make changes remotely by FTP:

In this above example,
we have a USB flash drive attached.
Unsurprisingly, FTP
transfers run much slower than with a direct USB connection to the player. The
following shows an upload transfer of a large file using FileZilla:

While files can also be
transferred from the player to the PC, these take even longer:

For a 700MB CD size
file, this would take just under 4 minutes to transfer to the player. For
larger transfers such as several Gigabytes of files or DVD folders, it would be
much quicker to set up the player with the PC and transfer the files directly
by USB.
FTP
Client Transfer
FTP file transfers can
also be carried out on the MediaStation. For this approach, we first need to
set up an FTP server on the PC, such as using FileZilla’s freeware FTP server.
When we go into the FTP client utility on the player, we can choose an existing
connection (if configured) or set up a new one using our PC’s IP and logon
details:

Once connected, we can
select files from the FTP server or local drive to transfer. Files can be transferred
in either direction and multiple files can be queued for transfer. However, as
far as we can tell, it is not possible to create new folders or transfer complete
folders.
The following shows an
example of the FTP client interface along with a transfer in progress:

From timing how long it
takes to transfer a large file in each direction, the transfer rate works out
at 2.7MB/s uploading to PC and 3MB/s downloading from PC. Like the previous
timing with the player acting as the FTP server, this may vary depending on the
PC and network performance. Either way, it is still significantly quicker to
carry out transfers using a USB connection to the PC.
One significant issue
we encountered with its FTP client is that it does not seem to be that stable.
During our testing, the player stopped responding during a transfer and another
few times with it simply left idle on the file browser. In each case, we had
to unplug the player to restart it, as even its standby button would not
respond.
Windows
Media Connect
One alternative to
using Samba based file sharing is to share content using Windows Media
Connect. The server is built into Windows Media Player and can be easily used
to share content with the media player, even in Windows 7 where we were unable
to do so using traditional file sharing.
To start with, we
enable file sharing in Windows Media Player and ensure it is configured to
allow access to all devices.

Next, we add the
content we want to share in the Windows Media Player library.
Finally, we go into
network on the MediaStation and go into the PC to browse the content:

A nice feature with
Windows Media Connect is that it organises the content in multiple ways, which
allows files to be browsed by category, album, artist, rating, playlist and so
on:

For anyone who has
their music, video or photo collection organised by Windows Media Player,
Windows Media Connect is by far the quickest and simplest method to share the
content with the MediaStation.
FTP
streaming
A final alternative to
Samba we’ll look at is FTP streaming. This is also another workaround to
streaming files from a Windows 7 PC than using traditional Samba based file
sharing or Windows Media Connect. An advantage with this method is that the
FTP server can be password protected, which is useful where the MediaStation is
used on a shared network where only the user only wants to allow the
MediaStation access to its shared content.
Basically, we start by
setting up an FTP server on the PC, such as FileZilla FTP server, set up a user
account and a home path which contains content to stream to the player. Next,
we configure the protocol on the MediaStation with our FTP server’s IP and
logon details:

Once configured, we can
browse the FTP server by going into the network browser on the player, just like
any other source:

As with the FTP client
transfer utility, we encountered the same issue where leaving the player
sitting idle on the FTP listing caused it to stop responding after a couple of
minutes. However, at least this does not happen during playback, even during a
lengthy song.
Internet
Radio
The MediaStation
supports Internet radio from Shoutcast and PLS/M3U playlists.
For Internet radio to
function, we first need to ensure the player is configured for the Internet.
If used with a DHCP enabled wired LAN connection, this is generally automatic,
but if it is used with Wi-Fi, it must be manually configured to use the
Wireless connection. As far as we can tell, Internet radio is the only feature
where the media player requires access to the Internet:

After this, we
configure the Internet radio to specify the source, buffer size and how many
servers to look-up:

Shoutcast
Radio
To start with, we’ll
have a look at its built-in support for Shoutcast radio. Once selected as the
“Server list:” in the configuration menu, we go into the Internet radio utility
to select the station and server to play from:

Depending on the radio
station the buffering time takes between 1 and 5 seconds, with most 128kbps MP3
stations taking around 3 seconds to buffer, at least with our Internet
connection. During playback, the playtime and song info (if available) are
shown. The bars in the “spectrum analyser” bounce up/down randomly for affect and
don’t match the music:

From our testing,
unfortunately its Shoutcast features are very limited and this method is not
that reliable either. While Shoutcast indexes over 31,000 radio stations at
this time of writing, the player only lists up to around of the top 24 stations
and that’s if we actually get to view the list! It usually took us several
attempts to launch the utility as quite often we get the error “No connection
server found”, even though we have a stable Internet connection. Finally, once
we do get the list of stations, the player often stops responding when we go to
select one, requiring it to be rebooted.
Playlist
Files
A better alternative we
found to using its Shoutcast feature is to build our own list of PLS/M3U
Internet radio playlist files. To do this, we go to Shoutcast’s website,
look-up the radio stations we are interested in and save the playlist files we
get from the “Tune-in” link. Finally, we place these files in a folder called
“iradio” on the MediaStation. In this example, we picked the following
stations:

Next, we configure the
MediaStation’s Internet Radio station list to “Off” and when we go into the
iradio utility, we get this radio station list:

From our testing with
this approach, the player is much more responsive and stable than having the
player retrieve the radio stations directly from Shoutcast. Another big
advantage with this is that we can select the radio stations we’re interested
in, rather than just be limited to the top stations it picks from Shoutcast.
Private
Folder
If the user has content
they don’t want others to view, the MediaStation can be configured to pin-lock
a folder called private. All we basically do is create a folder on its hard
disk called “private”, put the content we want to protect in here and configure
a password from the menu. Once locked, the “private” folder does not show in
the hard disk listing:

To access it, we need
to go into the setup menu and set it to ‘On’:

After we enable it, the
folder shows when we return to the hard disk listing:

The best use for the
private folder would be to protect young children from viewing unsuitable
content, such as 15+ and 18+ rated films. This protection does not prevent
anyone from accessing it through a network or with a direct USB connection to
the player.
One issue we
encountered with the private folder feature is that it does not automatically
re-enable the protection, even after the player is put in standby. To lock the
folder, we need to manually lock it again from the setup menu. However, it
would be nice if there was the option to have it prompt for the password each
time we navigate into the private folder or at least have the folder
automatically locked when the player is powered off.
Auto
Play
This feature causes the
MediaStation to resume playback of the last file that was played when the
player is taken out of standby. The feature can be easily enabled from the
setup menu:

This does not appear to
work with Internet radio. For example, when we put on the radio station “Club
977 80s” and put the player into standby, it resumed playback of the last file
we played prior to going into the Internet radio utility.
Other Features
The player has a
handful of features that can be configured from the menu, such as changing the
menu font colours, sound effects, screensaver and so on.
Graphical
User Interface Skin
Going by the manual, it
also appears that the background and icons can be changed by putting these
files in a skin folder on its hard disk. However, the user manual does not specify
any details such as file dimensions, sizes, types (jpeg, png, etc.) or even
what the filenames should be called, so we were unable to customise the user
interface apart from the font colours:

It’s quite likely
Verbatim originally intended to make GUI customisation packs that the user
could download load on to the player to customise the GUI.
For curiosity, we tried
creating a folder called “skin1” and placed random small images and icons in
it, but this had no effect on the player, even after rebooting.
Misc
Options
From the “etc.” menu,
we can configure a few miscellaneous options, which we’ll briefly discuss here:

Intro / Sound Effect – The player usually makes a sound effect after it has powered up,
the network goes up or a USB drive is plugged in. This option turns off these
sound effects.
Loading Message – While it’s nice to tell whether the player is busy loading rather
than wondering if it has stopped responding, this loading message can be quite
annoying while a slideshow is in progress. If the pictures are several
Megapixels in size, the loading message ends up being shown continuously on the
screen, so this option can be used to disable the message altogether.
Index loading time – For this, we have a choice of “when file plays” and “during time
search”. We’re not sure what this does and from our testing, it does not seem
to have any effect when we begin playback of music or video files or even when
using the “search” feature. This option is also not mentioned in the user
manual.
Screen Saver
– We can specify how many minutes before the player goes into its screensaver
when sitting idle or have it disabled.
Screen Saver while playing Music – This allows the screen saver to take effect even while playing
music. For Internet radio, the info window moves about the screen.
When the screensaver
takes effect, the Verbatim logo flickers randomly between red and yellow
colouring throughout the logo and the logo randomly appears about the screen:

Set LED on /off (Setup menu) – The player has both blue and red power LEDs on it.
This option turns the blue one off. While not that noticeable during the day,
as some are aware of, blue LEDs tend to look a lot brighter in a dark room.
In this page, we carry
out various tests such as to see which audio codec bit rates it supports, what
types of video are supported and high bitrate video. We will also cover high
bandwidth playback tests from external sources such as via the Network and
Wi-Fi.
Audio
Tests
As this MediaStation is
capable of playing WMA, MP3, OGG, Wave and MPEG4/AAC audio files, some may ask
about what bit rates and modes of each codec are supported. For example, WMA
could mean WMA standard, WMA professional, WMA voice, WMA VBR or WMA DRM, not
to mention the choice of bit rates also.
For these tests, we
used Goldwave to create different Wave formats, LAME to create different MP3
formats, Windows Media Encoder 9 series to create different WMA formats, OGG
Vorbis (libvorbis aoTuVr1) to test the Ogg format at various quality levels and
iTunes, Nero & FAAC to test MPEG4 audio at several different bitrates and
formats. The audio was tested using the analogue stereo audio output.
Wave
Audio
As Wave audio does not
need much processing besides resampling it to suit the internal DAC, we have
only carried out a limited number of tests on wave audio, which includes
different bit depths, sample rates and channels to basically cover from the
lowest to the highest bit rates one is likely to encounter.
The test results are as
follows:
|
Sample Rate |
Bit Depth |
Channels |
Result |
|
11kHz |
16bit |
Stereo |
Pass |
|
22kHz |
16bit |
Stereo |
Pass |
|
44kHz |
8bit |
Mono |
Pass |
|
44kHz |
8bit |
Stereo |
Pass |
|
44kHz |
16bit |
Mono |
Pass |
|
44kHz |
16bit |
Stereo |
Pass |
|
44kHz |
24bit |
Mono |
Pass |
|
44kHz |
24bit |
Stereo |
Pass |
|
44kHz |
32bit |
Mono |
Fail |
|
44kHz |
32bit |
Stereo |
Fail |
|
48kHz |
16bit |
Stereo |
Pass |
|
88kHz |
16bit |
Stereo |
Pass |
|
96kHz |
16bit |
Stereo |
Pass |
|
96kHz |
24bit |
Stereo |
Pass |
|
96kHz |
32bit |
Stereo |
Fail |
|
192kHz |
16bit |
Stereo |
Pass |
|
192kHz |
24bit |
Stereo |
Pass |
|
192kHz |
32bit |
Stereo |
Fail |
As pretty much
expected, the player has no problem playing all of our standard wave sample
rates of 8bit & 16bit depth. It also had no problem playing sample rates
all the way up to 192kHz, although it is not clear if the sample rate is
down-converted before reaching the DAC. 24-bit files also played fine. For
the 32-bit tests, the player just skipped the files.
MP3
Audio
As MP3 is still the
most widely used audio format when it comes to consumers carrying their music
on the move or downloading it online, some may ask what bit rates it supports
or whether it plays variable bit rate, etc. When encoding MP3, we left LAME to
decide on the sample rate and MPEG version. We will also test free-format bit
rates in which the MP3 is encoded at a non-standard bit rate, such as 125kbps
for example.
The Sample rates and
MPEG Versions LAME used for CBR encoding are as follows:
|
Sample Rate (Hz) |
MPEG Version |
Bit Rate (kbps) |
|
8,000 |
2.5 |
8, |
|
16,000 |
2 |
32, |
|
22,050 |
2 |
48 |
|
24,000 |
2 |
56, |
|
32,000 |
1 |
80 |
|
44,100 |
1 |
96, |
The Sample rates and
MPEG Versions LAME used for VBR encoding are as follows:
|
Sample Rate (Hz) |
MPEG Version |
Quality (-V options) |
|
44,100 |
1 |
0 to |
|
32,000 |
1 |
7 to |
|
22,050 |
2 |
9 |
For the Free-format bit
rate tests, we tested 88kbps and 152kbps to be in-between the regular bit rates
and still be a multiple of 8, 125kbps to test a bit-rate that is both
non-standard and not a multiple of 8 and finally a handful of bitrates from
328kbps to 640kbps in multiples of 8kbps.
The results of all the
MP3 tests are as follows:
|
Type of |
Result |
|
All standard CBR bit rates 8kbps to 320kbps |
Pass |
|
LAME quality encodings from 0 to 9 (VBR) |
Pass |
|
LAME free-format at 88kbps CBR |
Fail |
|
LAME free-format at 125kbps CBR |
Fail |
|
LAME free-format at 152kbps CBR |
Fail |
|
LAME free-format 328kbps to 640kbps |
Fail |
The player has no
problem handling all the standard MP3 bitrates, including all Variable Bit Rate
modes. For non standard MP3 bitrates, the player displays “File cannot be
played” when attempting to play any, however, it’s highly unlikely anyone
except those encoding using non-standard settings will encounter such MP3 files.
WMA
Audio
As pretty much everyone
has Windows Media player installed on their PC and some use it to rip their
music into WMA (often without realising it), it is handy to be able to play
Windows Media audio also. Note that this player does not support WMA DRM
natively, which means that Windows Media Player's copy protection feature must
be disabled when ripping music. Music purchased in the WMA format is also unlikely
to work either as most online stores that use the WMA format also apply DRM
copy protection. When WMA version 9 came out, Microsoft added a professional
WMA format as well as a Voice WMA format to this version, so these tests will also
cover testing out these special versions of WMA.
As Windows Media
encoder gives so many combinations of bit rates, sample rates and options for
encoding WMA, we have grouped bit-rates for a sample rate together to shorten
the table whenever a group all passed. For a few bit rates, Windows Media
Encoder gave a 'Low Delay' option by default, so in these few cases, there is
an '*' beside the bit rate.
|
Format |
Sample Rate |
Channels |
Bit Rates (kbps) |
Result |
|
Standard |
8,000 |
Mono |
5, |
Pass |
|
Standard |
8,000 |
Stereo |
12 |
Pass |
|
Standard |
11,000 |
Mono |
8, |
Pass |
|
Standard |
16,000 |
Mono |
10, |
Pass |
|
Standard |
16,000 |
Stereo |
16, |
Pass* |
|
Standard |
22,050 |
Mono |
16, |
Pass |
|
Standard |
22,050 |
Stereo |
20, |
Pass |
|
Standard |
32,000 |
Mono |
20 |
Pass |
|
Standard |
32,000 |
Stereo |
32, |
Pass |
|
Standard |
44,100 |
Mono |
20, |
Pass |
|
Standard |
44,100 |
Stereo |
32, 160, |
Pass |
|
Standard |
48,000 |
Stereo |
63*, |
Pass |
|
Bit |
44,100 |
Stereo |
48, 64, |
Pass |
|
Bit |
48,000 |
Stereo |
128, |
Pass |
|
ABR |
44,100 |
Stereo |
48, |
Pass |
|
ABR |
48,000 |
Stereo |
64, |
Pass |
|
Quality |
44,100 |
Stereo |
Variable |
Pass |
|
Quality |
48,000 |
Stereo |
Variable |
Pass |
|
Voice |
22,000 |
Mono |
22 |
Fail |
|
Professional |
44,100 |
Stereo |
127* |
Pass |
|
Professional |
44,100 |
Stereo |
128 |
Pass |
Like MP3, the
MediaStation plays all standard, VBR and ABR WMA encodings. For some reason,
when we played he 16kbps 16kHz stereo sample, the audio was quite distorted,
but still played, although this is unlikely to be an issue with very few audio
files now encoded with such a low bit rate in recent years. When it comes to
the newer WMA 9 formats, the only file the player refused to play was our Voice
format, saying “File cannot be played.” Both professional format tests played
successfully. Due to the large number of bitrates and customisations for WMA
professional such as 5.1 audio, we will not cover them in this review.
MPEG4
Audio
With the iPod leading
the portable audio player market and iTunes the leading application to
interface with the iPod, consumers who rip their CDs with iTunes will end up
with 128kbps CBR MPEG4 audio files if encoded at the default settings. Since
this player is designed to play MPEG4 audio, we will test a handful of audio
files created by iTunes at the most commonly used bit-rates as well as test
files created by the freeware FAAC command line tool and Nero Digital’s command
line encoder.
The results for our
iTunes encoded samples are as follows:
|
Format |
Sample Rate (Hz) |
Bit Rate (kbps) |
Result |
|
CBR |
44,100Hz |
96 |
Pass |
|
CBR |
44,100Hz |
128 |
Pass |
|
CBR |
44,100Hz |
192 |
Pass |
|
CBR |
44,100Hz |
256 |
Pass |
|
CBR |
44,100Hz |
320 |
Pass |
|
CBR |
48,000Hz |
128 |
Pass |
|
VBR |
41,000Hz |
192 |
Pass |
|
Podcast |
22,000Hz |
64 |
Pass |
As expected, all our
iTunes samples have played successfully, so those who rip their CDs in iTunes
will have no problem playing them on the player. It will obviously not play
copy protected MPEG4 files, such as iTunes store bought songs using DRM and the
M4P file extension.
In order to see what
other sample rates the player supports in AAC/MPEG4 audio, we used the freeware
command line tool FAAC to encode test files with common sample rates ranging from
8kHz to 96,000Hz, including one mono test in both the MPEG2 AAC and MPEG4 M4A
formats. We let the encoder use its default bitrate setting and VBR encoding
method, with the average bitrate for each sample shown in the table. For the
88kHz and 96kHz tests, we specified a bandwidth of 32kHz as FAAC’s default low
pass cut-off filter is 16kHz. The results are as follows:
|
Format |
Sample Rate |
Channels |
Bit Rate (kbps) |
Result |
|
AAC |
8,000Hz |
Stereo |
41 |
Fail |
|
AAC |
11,025Hz |
Stereo |
58 |
Fail |
|
AAC |
22,050Hz |
Stereo |
109 |
Pass |
|
AAC |
44,100Hz |
Mono |
72 |
Pass |
|
AAC |
44,100Hz |
Stereo |
156 |
Pass |
|
AAC |
48,000Hz |
Stereo |
156 |
Pass |
|
AAC |
88,200Hz |
Stereo |
260 |
Pass |
|
AAC |
96,000Hz |
Stereo |
241 |
Pass |
|
M4A |
8,000Hz |
Stereo |
41 |
Pass |
|
M4A |
11,025Hz |
Stereo |
57 |
Pass |
|
M4A |
22,050Hz |
Stereo |
108 |
Pass |
|
M4A |
44,100Hz |
Mono |
70 |
Pass |
|
M4A |
44,100Hz |
Stereo |
153 |
Pass |
|
M4A |
48,000Hz |
Stereo |
154 |
Pass |
|
M4A |
88,200Hz |
Stereo |
255 |
Pass |
|
M4A |
96,000Hz |
Stereo |
238 |
Pass |
For some reason the
player will not play 8kHz or 11kHz files in the AAC format, but will play these
fine with the M4A format. However, as it is rare to come across 8kHz or 11kHz
audio files in recent years, this is unlikely to ever be an issue, as even low
bitrate podcasts are generally encoded with at least a 22kHz sample rate.
After iTunes, another
fairly well known MPEG4 encoder is Nero’s own encoding tool. Unlike iTunes and
FAAC, this tool can also encode using the High Efficiency V1 & V2 profiles,
so we’ll include these in our tests. With a wide range of bitrate choices, we
grouped them together whenever a set passed, like for the WMA tests. As all
the encodings showed a sample rate of 44,100Hz and were in stereo, we excluded
the sample rate and channels columns. All tests were carried out in both the
AAC and M4A containers.
|
Profile |
Bit Rate |
Result |
|
Standard (AAC) |
16, 24 |
Fail |
|
Standard (M4A) |
16, 24 |
Fail |
|
Standard |
32 to 128 (steps of 8) |
Pass |
|
Standard |
160, 192, 224, 256, 296, 320 |
Pass |
|
High Efficiency |
16 to 128 (steps of 8) |
Fail |
|
High Efficiency V2 |
16, 24, 32, 40, 48, 56 |
Fail |
|
Low Complexity (AAC) |
16, 24 |
Fail |
|
Low Complexity (M4A) |
16, 24 |
Pass |
|
Low Complexity |
16 to 128 (steps of 8) |
Pass |
The player had no
problem playing all the tests in the M4A container, apart from the high
efficiency profile tests. For the AAC container, it plays all but the 16kbps
and 24kbps tests. While the player did try playing the high efficiency profile
tests, both formats played in the compatibility mode, as the audio sounded no
brighter than the equivalent tracks encoded in the standard profiles with the
same low bitrates.
OGG
Vorbis Audio
Finally, we try out one
of the most popular open source non-proprietary audio codec’s. This audio
codec has come on a long way since it became publicly available and has long
outperformed most of the common audio codec’s at 128kbps, which use to be a
common bit-rate used to give a balance between audio quality and file size back
when flash memory was of very limited capacity and expensive. However, its
limited hardware support has likely prevented this codec from competing
successfully with MP3.
As OGG Vorbis has been
designed to be used as a VBR codec, for this test we have tested it at quality
levels ranging from -2 to 10, which gives an average of 40kbps to 558kbps
respectively for our 44,100Hz 16-bit stereo test sample. We also tested a
variety of sample rates as well as a mono test.
|
Sample Rate (Hz) |
Channels |
Encoding Quality |
Result |
|
8,000Hz |
Stereo |
Q3, |
Pass |
|
11,025Hz |
Stereo |
Q3, |
Pass |
|
22,050Hz |
Stereo |
Q3, |
Pass |
|
44,100Hz |
Mono |
Q3, |
Pass |
|
44,100Hz |
Stereo |
Q-2 |
Pass |
|
48,000Hz |
Stereo |
Q3, |
Pass |
|
88,000Hz |
Stereo |
Q3, |
Pass |
|
88,000Hz |
Stereo |
Q10 |
Fail |
|
96,000Hz |
Stereo |
Q3, |
Pass |
|
96,000Hz |
Stereo |
Q10 |
Fail |
|
192,000Hz |
Stereo |
Q3, |
Fail |
Like the other codecs,
the player handles all the standard quality levels for OGG Vorbis, ranging from
the minimum to maximum quality that the Vorbis encoder supports. For sample
rates above 88kHz, the encoding bitrate begins to become a limitation, with the
Q10 encoding quality resulting in broken up audio at 88kHz and 96kHz. For the 192kHz
test, none of the three encoding qualities gave a playable file.
Video
Tests:
This player is capable
of playing a wide variety of video formats including MPEG 1/2/4, XviD and
DivX. However, like with the audio tests, it is not clear what its limitations
are on each codec. So, in this set of tests, we will test what MPEG4 features
the player supports (using XviD) and determine roughly what is the maximum
bitrate the player is capable of playing MPEG4 at. We used a recording of a TV
commercial break (which has a lot of action) as the source for the XviD MPEG4
tests and a 1080i (1920 x 1080) 60Hz 18.4Mbps MPEG2 file as the source for each
encoding, which also has plenty of motion and detail.
MPEG 1
& 2 Tests
As the player is
capable of playing back DVD images and folders, we know already that it is
capable of playing MPEG1 & MPEG2 files in at least DVD’s standard
resolutions. However, what about MPEG2 files from other sources, such as
Digital satellite and cable AV bitstream? In this test, we used a variety of
recordings from satellite TV in resolutions varying from 352x576 to 720x576 and
included two common MPEG1 resolution tests.
|
Codec |
Extension |
Resolution |
Frame Rate |
Result |
|
MPEG |
.mpeg |
352x240 |
30Hz |
Pass |
|
MPEG |
.mpg |
352x288 |
25Hz |
Pass |
|
MPEG |
.mpg |
352x576 |
PAL |
Pass |
|
MPEG |
.mpg |
480x576 |
PAL |
Pass |
|
MPEG |
.mpg |
528x576 |
PAL |
Pass |
|
MPEG |
.mpg |
544x576 |
PAL |
Pass |
|
MPEG |
.mpg |
702x576 |
PAL |
Pass |
|
MPEG |
.mpg |
720x576 |
PAL |
Pass |
|
MPEG |
.vob |
720x480 |
NTSC |
Pass |
|
MPEG |
.vob |
720x576 |
PAL |
Pass |
|
MPEG |
.ts |
720x576 |
PAL |
Pass |
All files with the
‘.mpg’ or ‘.vob’ file extensions played perfectly, which means that those who
record the bitstream from satellite or cable TV do not need to re-encode their
video, assuming it’s already in MPEG1 or MPEG2. These “.mpg” recordings were
all made by ProgDVB, however, we when we went to play recordings made by
DVBViewer, we encountered the occasional recording that the player refused to
play, even the occasional recording from a channel where other recordings from
the same channel play fine.
For MPEG files and
recordings of channels with different aspect ratios, the player adjusted the
output accordingly to match its TV output configuration.
XviD/MPEG4
Encoding Feature Test
While this player is
capable of playing DivX and XviD MPEG4 files, it is unclear which MPEG4
encoding features it will handle or what containers it handles. For example, a
DVD player that can play XviD files may not support Global Motion Compensation
(GMC) or an AVI file with AC3 audio. So, for these tests we will use XviD's
different advanced encoding features and see how the player reacts to each
encoded file.
The source file is a
recording made from a TV commercial which had a combination of various motion,
colour and fine detail. All of our clips were made from the same source, which
had a resolution of 704 x 576. We used quality based encoding (Quality 8) in
Avidemux with the default XviD options including no B-frames and packed
bitstream disabled and apart from where specified in the table. All tests were
carried out with the output set to 576i and 1080P, which also let us see how
well it handles the interlaced video clips in each case. For the subtitles and
MP4 container tests, we used DVD Fab’s product “DVD To Mobile” to convert an
episode from our Garfield source DVD.
|
Encoding Feature |
Result |
|
Quality |
Pass |
|
Quality |
Pass |
|
Maximum |
Pass |
|
Maximum |
Pass |
|
Maximum |
Fail |
|
Maximum |
Pass |
|
16:9 |
Pass |
|
AC3 |
Pass |
|
AAC |
Pass |
|
MP2 |
Pass |
|
Global |
Fail |
|
Interlaced |
Pass |
|
Interlaced |
Pass |
|
Quarter |
Pass |
|
Two |
Pass |
|
Subtitles |
Fail |
|
AVC |
Fail |
The first two tests
basically ensure that the player can play the video smoothly at the default
encoding parameters used in the other tests as well as at a higher bitrate. We
will cover higher bitrates later when we carry out HD tests. As far as we can
tell, all the tests that passed appeared to play as smooth as each other. For
the subtitle test, the player was able to list the subtitle choices, but when
we chose either, no subtitles were shown. For the multiple sound track test,
we can choose between the two using the ‘Audio’ button. For the aspect ratio
test, the player had no problem respecting the 16:9 attribute even with a 704 x
576 resolution typically used by 4:3 video in AVI encodings. For the GMC test,
the video randomly broke up, showing it does not support global motion
compensation. Finally, for the interlaced version, player was able to
deinterlace the video regardless of the field order. The interlaced video did
not play as smooth as the original interlaced MPEG2 file, so the player does
not make use of any additional motion compensation when playing interlaced video
AVI files.
High
Definition Tests
As this is a high
definition media player, in this test we basically test out a few commonly used
high definition codecs, containers and bitrates.
|
Codec |
Extension |
Resolution |
Frame Rate |
Bitrate |
Result |
|
MPEG2 |
.trp |
1920 x 1088 |
60i |
18.4Mbps |
Pass |
|
MPEG4 (XviD) |
.avi |
1280 x 720 |
30p |
1.5Mbps |
Pass |
|
MPEG4 (XviD) |
.avi |
1280 x 720 |
30p |
3.0Mbps |
Pass |
|
MPEG4 (XviD) |
.avi |
1280 x 720 |
30p |
4.5Mbps |
Pass |
|
MPEG4 (XviD) |
.avi |
1280 x 1080 |
25p |
6Mbps |
Pass |
|
MPEG4 (XviD) |
.avi |
1920 x 1088 |
30p |
1.5Mbps |
Pass |
|
MPEG4 (XviD) |
.avi |
1920 x 1088 |
30p |
3.0Mbps |
Pass |
|
MPEG4 (XviD) |
.avi |
1920 x 1088 |
30p |
4.5Mbps |
Pass |
|
MPEG4 (XviD) |
.avi |
1920 x 1080 |
30p |
8.0Mbps |
Pass |
|
MPEG4 (XviD) |
.avi |
1920 x 1080 |
30p |
9.7Mbps |
Pass |
|
H264 (AVC) |
.ts |
1920 x 1088 |
50i |
16.5Mbps |
Fail |
|
WMV9 Pro |
.wmv |
1280 x 720 |
24p |
6.43Mbps |
Pass |
|
WMV7 |
.wmv |
1920 x 1088 |
30p |
6.2Mbps |
Fail |
|
WMV8 |
.wmv |
1920 x 1088 |
30p |
6.55Mbps |
Fail |
|
WMV9 AP |
.wmv |
1920 x 1088 |
30p |
5.37Mbps |
Fail |
|
WMV VC1 |
.wmv |
1280 x 720 |
30p |
18.19Mbps |
Fail |
|
WMV9 Pro |
.wmv |
1920 x 1088 |
30p |
16.06Mbps |
Fail |
|
WMV9 Pro |
.wmv |
1920 x 1088 |
30p |
19.53Mbps |
Fail |
The player had no issue
with all the XviD tests, including the clips with the extra 8 lines. All files
played back very smooth when we played files with a frame rate to match what
the player is outputting. Unfortunately, unlike some other high definition
media players available, this player is incapable of playing H264/AVC encoded
video, which means that transport stream recordings made from a H264 video
broadcast (especially in HD) will need to be re-encoded before they can be
played back on the player.
For the Windows Media
tests, we re-encoded our MPEG2 test clip using Windows Media Encoder using a
couple of resolutions and profiles. After several tests, it appears that the
player will only play up to 1280 x 720 in the Windows Media Video 9 Pro
format. In the other tests, the player either gave an error saying that the
file is not supported or just skipped it.
USB
Bandwidth Test
While we know that the
player is well capable of playing up to at least 18.4Mbps from its internal
hard disk, it is useful to be able to play high bandwidth files from a USB
drive also, such as a pen drive or USB hard disk. In this test, we will be
using a 220x (33MB/s) 16GB Dane Elec USB flash drive.
|
Codec |
Bitrate |
Result |
|
MPEG4 |
1.5Mbps |
Pass |
|
MPEG4 |
3Mbps |
Pass |
|
MPEG4 |
4.5Mbps |
Pass |
|
MPEG4 |
6Mbps |
Pass |
|
MPEG4 |
8Mbps |
Pass |
|
MPEG4 |
9.7Mbps |
Pass |
|
MPEG2 |
18.4Mbps |
Pass |
The player had no
problem playing all our bitrate test clips from the USB flash drive. For the
final MPEG2 test, we let the clip play to the end to ensure it did drop frames
during playback.
Network
Cable Bandwidth Test
One of the main
purposes behind this player is to be able to play video from a network share.
This advantage here is that one does not need to transfer video to its hard disk
or to a USB drive to be able to play it on the player. For this test, we
shared out a folder containing our test files on the PC and played the shared
files from the player.
|
Codec |
Bitrate |
Result |
|
MPEG4 |
1.5Mbps |
Pass |
|
MPEG4 |
3Mbps |
Pass |
|
MPEG4 |
4.5Mbps |
Pass |
|
MPEG4 |
6Mbps |
Pass |
|
MPEG4 |
8Mbps |
Pass |
|
MPEG4 |
9.7Mbps |
Pass |
|
MPEG2 |
18.4Mbps |
Pass |
Like with the USB drive
test, we had no issue playing any of our test files via the network.
Wi-Fi
Bandwidth Test
For this test, we set
up the player with our Wi-Fi network, with the player and Wi-Fi access point in
the same room for under ideal testing conditions:
|
Codec |
Bitrate |
Result |
|
MPEG4 |
1.5Mbps |
Pass |
|
MPEG4 |
3Mbps |
Pass |
|
MPEG4 |
4.5Mbps |
Pass |
|
MPEG4 |
6Mbps |
Pass |
|
MPEG4 |
8Mbps |
Pass |
|
MPEG4 |
9.7Mbps |
Pass |
|
MPEG2 |
18.4Mbps |
Fail |
From these tests, the
player will have no problem playing video content up to 10Mbps. For our
18.4Mbps test, the video was very choppy, which means 10Mbps is what we would
consider the maximum safe bitrate for Wi-Fi usage, assuming the player is
located in strong Wi-Fi coverage. As these tests were carried out under ideal
conditions, the performance will vary depending on the distance between the
players, other interference such as video senders, cordless phones and so on.
Video
output picture quality
One thing we noticed
early on in the review was a very noticeable difference in the picture quality
between the component and HDMI outputs, so we decided to have a closer look.
To start with, we compared Full HD against 720p on both Component and HDMI and
added in a quick PAL Test with S-Video and Composite to see what improvement
the high definition outputs give.
Before we opened our
reference photograph, the differences were already noticeable in the user
interface:


HDMI - 1080p (left) and 720p (right)


Component - 1080i (left) and 720p (right)


S-Video PAL (left) and Composite PAL (right)
The above screenshots
were taken by pointing our DSLR camera at the monitor with the same aperture
and shutter speed used in all six photos. Due to the moiré effect caused by
the way the camera’s sensor captures the LCD display, the differences are much
more noticeable on the monitor itself than what the camera has captured. The
720p shot above is not an out of focus photograph, but shows just how soft the
player’s output is with component video. In our opinion, both the S-Video and
composite outputs look clearer than the 720p component output. Also, to our
eyes, the HDMI 720p output also looks noticeably more detailed than even the
1080i component output. An example can be seen by looking at the letters ‘jp’ in
each of the above images.
In the following
comparison, we took a high resolution photograph of wild flowers and resized it
to 1920x1080 to match the native resolution of Full HD:


HDMI - 1080p (left) and 720p (right)


Component - 1080i (left) and 720p (right)


S-Video PAL (left) and Composite PAL (right)
From these photos, the
differences between the outputs become very clear. Again, we can confirm that
each photograph was in clear focus. The faint slanted vertical lines are not
actually present in the picture, but are the moiré effect from the camera
taking the photo of our LCD display.
We’re unsure whether
there is a problem with the component video output of the player, but based on
these comparisons, we would not recommend using the component output, except if
it is the only input available on the TV. Even both legacy S-Video and
composite outputs appear to give a sharper and more contrast picture than both
component output HD modes.
Power consumption
When purchasing any
electrical appliance, many consumers may not realise that the item they bought
could end up costing them a lot more than its initial price in energy
consumption during its lifespan, often with most of this energy used by the
appliance simply left in standby over its life!
An appliance’s energy
consumption is measured in watts or kilowatts (1000 watts) and the total
consumption is measured in kilowatt hours (kWh.) For example, a heavy usage
item such as a typical electric bar heater uses 1kW, while a typical 19” LCD TV
uses around 50 watts switched on. If this TV is used for 40 hours a month and
unplugged when not in use, its total power consumption over the month would be
2kWh (40 x 0.05kW), which is the same power consumption as if the electric bar
heater was used for 2 hours (2 x 1kW) over that month. Now, let’s say this TV
uses 10 watts in standby and this time the user still uses it for 40 hours a
month, but leaves it in standby when not in use. For a 30-day month, this
means the TV is in standby for 680 hours, which gives a total power consumption
of 6.8kWh (680 x 0.01kW) per month. This standby energy consumption alone is
the equivalent to running that same 1kW electric heater for almost 7 hours for
no purpose each month! Now it becomes clear why appliances left in standby get
the nickname “electricity vampires.”
For this test, we
measure the power consumption when left idle switched on, during video playback
and when in standby using a watt meter. The following shows the watt meter
with the player idle on the media browser after powering it up:

To measure the power
consumption with the internal hard disk spun down, we waited at least 5 minutes
before taking a reading, as the player appears to power off its internal hard
disk after just a few minutes without any activity from it. The measurements
are as follows:
|
Player’s |
Watt meter |
|
Idle at media browser with HDD spinning |
16.1w |
|
Idle at media browser with HDD spun down |
13.7w |
|
Idle at media browser with USB HDD attached |
18.2w |
|
Video playback from internal HDD |
18.4w |
|
Video playback from USB flash with HDD spun down |
13.9w |
|
Video playback with USB HDD attached & HDD spinning |
20.7w |
|
Player in standby |
0.0w |
Going by the readings,
this player uses very little energy consumption, which is very low considering
it has a 500GB internal HDD. When we put the player in standby, the power
consumption was too low for the meter to measure. To give a comparison, a
typical desktop PC with on-board graphics uses around 100 watts when idle and
most plasma TVs consume over 300 watts running. The highest energy consumption
we measured from this player was when playing video from its Internal HDD with
a USB bus-powered 2.5” HDD attached. While a desktop or network HDD with its
own power supply would likely consume more power, the purpose of this test is
to measure the power consumption from this player.
As the meter was unable
to measure its power consumption while in standby, this player is unlikely
going to have a noticeable effect on the electricity bill whether or not it is
kept in standby or unplugged. However, with it consuming as much as 18 watts
idle with a USB HDD attached, we recommend at least putting the player in
standby when not in use. As we mentioned earlier in the review, the player
also has a “Standby after playback finishes” feature to automatically go into
standby once the file ends.
This concludes our Verbatim MediaStation Pro review;
let’s head on to the last page to read our conclusion…
Positive
- Very
compact at roughly the size of an external 3.5” desktop hard disk. - Bundled
with a wide variety of cables, including a HDMI cable. - Media
browser and menus are simple to navigate and switch between media file types. - Menus
load up quickly and most file listing pages appear instantly. - Multiple
HDD access methods: USB, FTP server and built-in FTP client. - Data
can also be copied to an attached USB drive via network using its FTP
client or remotely via its FTP server. - It
can stream Media from Samba, FTP, NFS and Windows Media Connect sources. - A
playlist can be made of a mixture of music, photos & video from
multiple folders. - Video
picture can be adjusted up/down & left/right and finely zoomed for
files with unwanted borders. - It
is able to resume playback at a later time, even after standby or after playing
other files. - Plays
DVD folders like DVDs, including DVD menus and features. It can also play
DVDs from a USB DVD drive. - Password
protected private folder for parental control. - Screensaver
takes effect during music or Internet Radio playback. - Background
music can be set up to play during slideshows. - Wide
support of audio file encodings, including up to 192kHz sample rate in
Wave files, 96kHz in OGG Vorbis and 24-bit encodings. - Very
low power consumption, especially in standby. Also includes a sleep
setting to go into standby after playback ends.
Negative
- Player
not that stable, especially with navigation during playback. - No
support for H.264/AVC video or FLAC audio files. - Remote
control buttons cluttered, difficult to use in low light. - Limited
support for samba (Windows) network folders. - No
support for password protected network folders, except FTP shares. - XviD
and especially DivX files are slow to start playing or resume from pause. - Internet
Radio only indexes a few stations from Shoutcast or from user-prepared
Internet Radio playlist files. - Component
video output gives very poor picture quality.
Conclusion
Let us summarise the
most important positive and negative points below:
The
Main Positive Points
The player comes with
everything most users need to get started including HDMI, coaxial audio,
component and AV cables. With its size about that of an external 3.5” hard
disk, it can easily fit into tight spaces where even a slim set-top box would
not fit, such as placed vertically standing next to the TV. It is also very
quiet in operation and does not have any fans either.
Its user interface is
simple to use and media file menus load up quickly, far quicker than most other
media players we’ve used and reviewed. Those interested in streaming can do so
from several types of media sources, although we found the player worked best
when streaming from Windows Media Connect shares. For copying files to its internal
hard disk, this can be done via the network or from the player itself through
FTP.
For video playback, the
user can zoom in and out of the picture in small steps as well as move it in
any direction, which is very useful for watching video files which have been
encoded with unwanted borders. For DVD folder playback, we were able to take
advantage of all the DVD features and menus as if we were playing the actual
DVD.
The
Main Negative Points
Unfortunately, we did
run into a couple of problems throughout the review, with stability being the
main issue. For general file playback, the player will easily play hours of
music or video without an issue, however, when it comes to navigation, the player
regularly hung on us, especially when fast forwarding/rewinding, switching
radio stations and working with FTP sources.
It has limited support
for Windows network shared folders, as it only supports non-password protected
shares, requires the Windows guest account to be enabled and does not seem to
work at all with Windows 7 shares. However, a workaround is to use Windows
Media Connect, which worked fine even from our PCs running Windows 7.
There is no support for
H.264/AVC encoded files, which will put this player at a disadvantage for those
with recent digital cameras and camcorders that use this video format or who
have High Definition encodings in this format.
Finally, while it
provides very good picture quality from its HDMI output, we found its picture
quality to be unacceptable from its component video output, with high
definition images appearing no better than when viewed from its legacy S-Video
output.
To sum
it all up, this is what we would say:
“The MediaStation Pro
is an easy to use media player that can fit in tight spaces, plays and streams
from a variety of media sources and provides useful variety of features.”

We found the Verbatim
MediaStation Pro is currently retailing for £156 at Amazon UK (December 2009).
Thanks
To:
 |
Fengtao software |
 |
EFD |


")